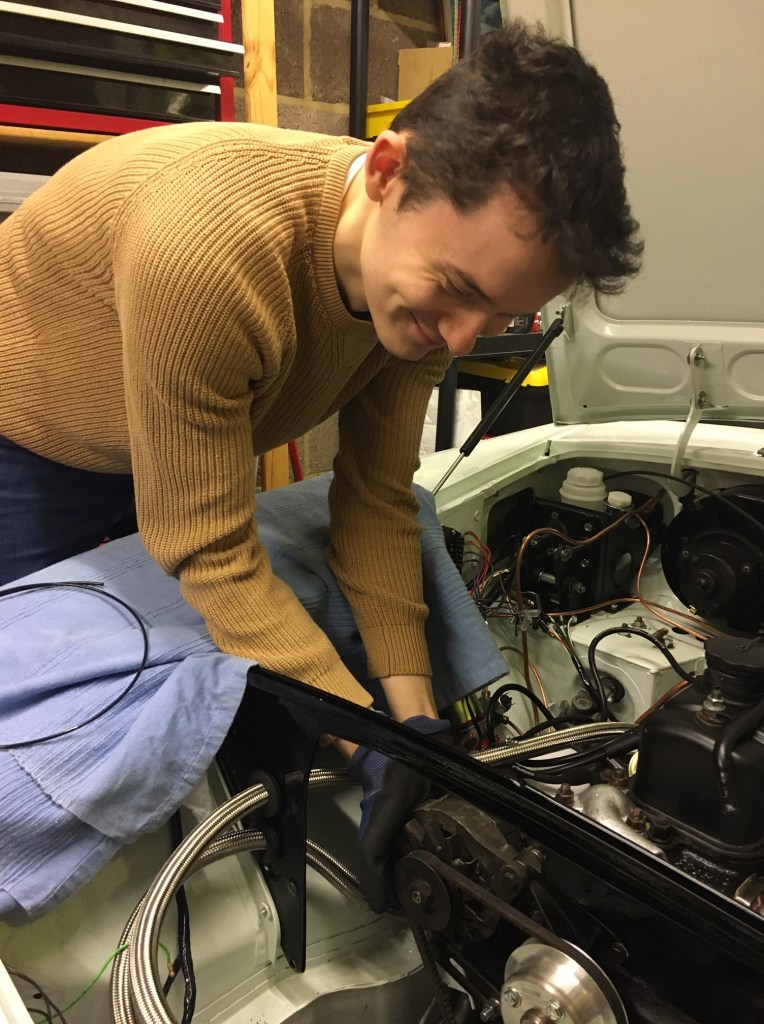
Spent a couple of hours on the MG this afternoon. It was cold and windy so I confined myself to the garage. First job was to finish off fitting the new rubber oil cooler pipes. I am replacing the nasty braided ones which are very stiff with OE spec rubber which is a bit more pliant. This is an awkward fit and it requires a bit of coordination because the oil gauge pipe has to be fitted AFTER the pipe cooler pipe because otherwise the spanner crushes the oil gauge pipe. Have a guess how I know this? After fitting the pipes I had to fit the hateful grommets to the radiator shroud which is another awkward job. Anyway it’s done now.
It’s all a bit congested here
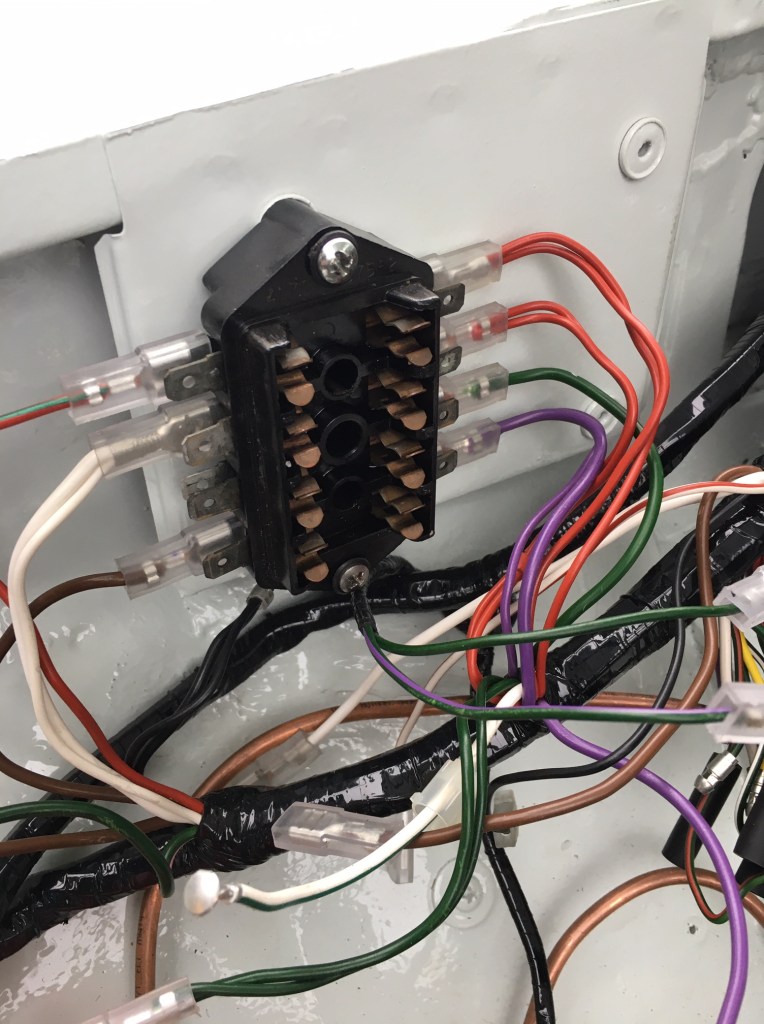
Next I decided to progress the wiring loom connections. Last week I had to unpick the loom due to poor routing so this week I put some of that back. I connected the alternator which is easy then had to take the coil off to get that connected properly. So far so good. I then checked the fuse box which I wasn’t convinced had been connected properly. Rather than rely on pictures on the internet I actually used the wiring diagram and managed to use up all the available wires so it must be right! (It is right really).
So onto the next thing and I identified a problem. The distributor, which is a new unit from Accuspark needs power which it gets from the coil. Unfortunately one of the cables is not long enough. It mentions this in the instructions which cheerfully say ‘you may have to lengthen the wire’. I might write back to them to say ‘you could just supply the right length wire.’ So I need to grab a pal who can joins a bit of wire for me
This is the probably definitely correctly connected fuse box
Final task today was to fit an earth wire to the inner wing. The original bolt had been painted over and the head rounded off when I tried to release it. Even my freeze spray couldn’t rescue the situation so I did the brutal thing and drilled it out. I managed to then get another bolt to fit and job done. Not a bad afternoon’s work.
A welcome visit from Dad who battled through, or rather around, floods in Gloucester to help me out today. Overall we made some useful progress, although as is often the case we had to go back to go forward. Before Dad had arrived, I pushed the MG out onto the drive and ended up unconnecting the loom under the bonnet because I now realise the routing of one of the branches was wrong and unless I pulled it all out, I wasn’t going to be able to connect the heater amongst other things. So a step back, but better to find it now than later.
Dad arrived and I prioritised having a cup of tea and an ice bun inside the house. You can’t mechanic on an emtpy stomach. So onto the work and Dad had expressed concern that we had not flushed the water jacket through. The heater control valve was clogged with rust on disassembly and so there was reason to suspect some corrosive sludge was lurking in the engine block. First we fitted the heater control valve to the engine block – this was to be our inlet for the flush – awkward job this as the bolts are inaccessible. I had tried new bolts, but these were about 2mm too long, so we had to dig out some shorter old bolts from the box of MG bolts. We then blocked up the top hose with a lump of wood wrapped in tape. With a finger in the temperature sensor hole and one on the heater rail pipe, we connected the garden hose and switched on. We got a dose of dirtyish water out the bottom hose, but not the expected deluge of rusty water. Holding my hand over the bottom hose built up a little bit of pressure, but we concluded that we had done what we could, so we refitted the radiator and hoses. This simple job actually took ages, because the radiator is awkward to remove and the hoses were not exactly co-operating either. In any case, we were in good spirits and Dad was great company.
Heater control with hose attached
Top hose blocked with a lump of wood
Next Dad’s keen eye focussed in on the distributor which I had ‘fitted’ but he spotted that the clamp was on the wrong way and hence it wasn’t seated correctly, with the cap in contact with the steering column, which was a bit of a clue. Needless to say, he sorted that out although we weren’t able to accurately set the timing which needs to be done with a timing light apparently. Anyway, its in as good a state as it can be prior to attempting a start up in the near future.
What a top Dad he is
We broke for a sandwich lunch during which we were googling MGB engine bay pictures and researching bullet connector pliers. With a target of filling the car with coolant, our afternoon was spent in fitting and modifying in some cases the hoses of the cooling system. Facing a challenge with routing of the capilliary tube for the temperature sensor, Dad came up with a clever idea of using the bottom bolt of the heater control valve to fit a cable clip, lined with rubber hose to gently locate the tube and stop if waving around in the engine bay. Execution of this brilliant idea came down to me, and it was a pig of a job (thanks Dad) as the 7/16th bolt is very awkward to reach and one of those situations where you get about 1/4 of a turn at best with each placement of the open jawed spanner. Couldn’t get a socket or ring spanner to it, so just had to plug away. I only nearly cried once, but that was the wind in my eye. We then wound the excess length of the tube into coils to deal with any vibration in use.
Time was ticking on and Dad needed to get away for 3:00pm as flooding on roads near his house was a real risk, not to mention that he had worked bloody hard all day and is 73 years young. Of course, we made it with minutes to spare – all hoses complete and coolant topped up, and the car pushed into the garage missing a downpour of heavy rain.
So thanks to my Dad – he knows his stuff, he gets stuck in, he’s always looking to improve everything he tackles, he doesn’t let things get him down, he’s great fun to be around, are you getting the picture? He’s one in a million, thanks Dad.
Seriously stormy weather today in Wiltshire, courtesy of Dennis, so the only option for progressing the MG was to work within the confines of the garage. This limited what I was able to do, but actually we made some good steps forward, so not too bad at all. First of all, a couple of photos attempting to record just how grim the weather was. Its difficult to capture it, but it was just relentless wind and rain.
Looking out the front at the cemetery opposite, you can see the stormy skies
The back garden looks forlorn today
Looking out across the Cappuccino
Decided to fit the radiator and hoses today. I bought the radiator and new hoses over a year ago, and they’ve just been sitting there waiting installation while I have built everything else up. The installation, which should have been a simple bolt on, took a bit longer because the radiator bolts did not align with the radiator shroud to which its mounted. I had previously fitted the shroud so envisaged just bolting it on. I attempted to overcome the misalignment by pushing and pulling, but that didn’t work. So I decided to unmount the shroud, fit the radiator to this, and then fit that to the car (via captive nuts on a lip on the inner wings). This method worked well and as I removed the shroud I could see that the holes for this were slotted so maybe that’s how the misalignment occured. I had plenty of practice putting the bolts on and off, that’s for sure. Next task was to fit the hoses and although these were a bit fiddly, a bit of patience and some Fairy Liquid got them mounted and I then fixed them with jubilee clips. I have now reached the stage of needing to have jubilee clips all facing the same way and I had one hose fitted before I realised the clips was the wrong way around, so that had to come off again! As I was in the area, I fitted the thermostat housing gasket which I had missed off when I fitted it earlier. Nice new shiny nuts and washers improved the look too.
While fitting the bottom hose I briefly managed to get my arm stuck between the alternator and the radiator. I had my sleeve rolled up and was reaching right down to fit the hose and as I went to pull my arm out, nothing happened. My arm just stayed put. This has only happened once or twice on this project, but it it is weird when it happens because you sort of think ‘well it went in, so it has to come out’. From experience, the thing to do is to think your way out as opposed to tugging to get free which just hurts and doesn’t always work. Anyway with a bit of a wriggle, I was free with no need to undo the radiator I had just fitted to free myself.
After this drama, I fitted the radiator stays. I had bought replacements for these, and also repainted the originals. The originals fitted better when I offered them up, so I fitted those, the others will go into my surplus sale box. On the near side, I had to replace one of the wing bolts, as the radiator stay relies on this for its fixing, and the bolt fitted was too short. I fitted a longer bolt and that all worked, but now I have one steel looking bolt, and the rest painted white. Something to touch up at some point.
Thermostat gasket
Looking down at the radiator
The completed installation
I decided to re-use the original radiator cap, but it was a bit scruffy, so I cleaned it up using first my Dremel tool, then sandpaper and then metal polish. Quite pleased with the result pictured below.
Rad cap part of the way through the clean
Finished rad cap screwed into the radiator
The last job I tackled was to fit the proper spark plugs which I had bought over two years ago when I started the engine to see if it would go. I have already gapped them before, so it was just about fitting them. I removed the old faithful plugs that came with the car which only served the purpose of plugging the hole when the engine was out the car. I checked the plug leads were fitted in the correct firing order and they were.
Away from the garage I braved two forays outside to Halfords. First time to buy a battery as recommended by someone on the Facebook MG restoration page. It looked a bit big, but I thought I would trust the advice. Second visit to Halfords was to take the battery back and this time taking along my existing battery as a size comparison. Halfords were very nice and I did a quick exchange to obtain the correct size. I like our local Halfords, they have always been helpful and although they don’t stock everything, they’ve been good to me and don’t have any thing bad to say about them. The new battery is to give us the best possible chance of a successful engine start soon.
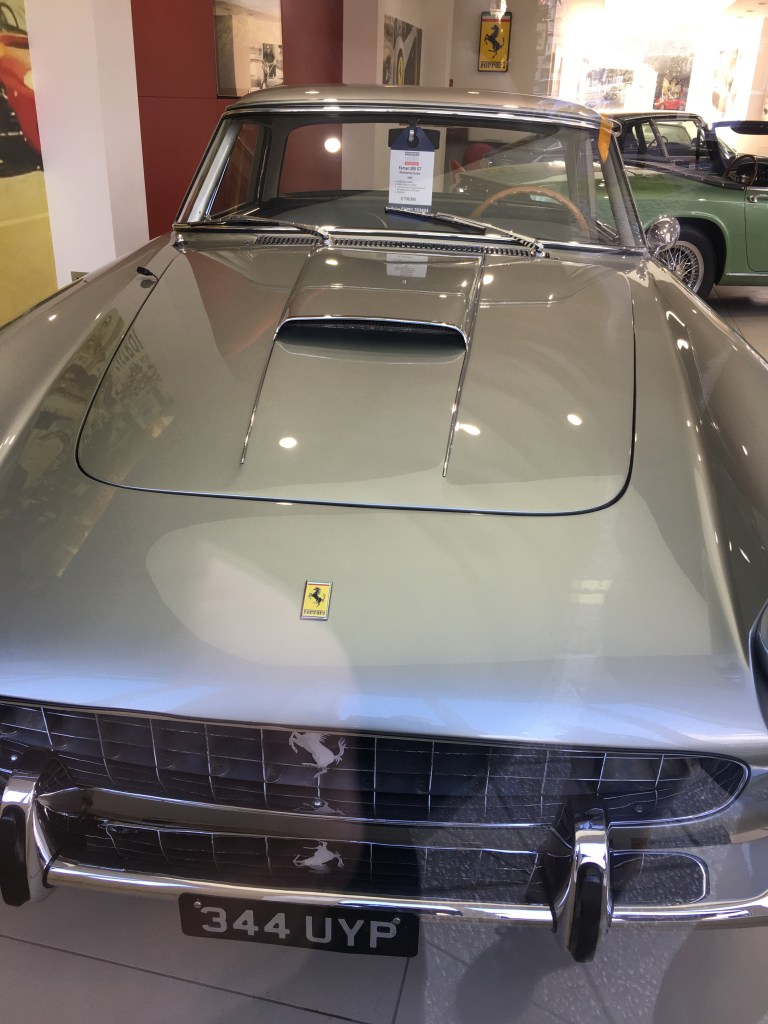
Away for the weekend with friends in the new Forest we happened upon a Ferrari dealer in the small town of Lyndhurst. I am a fan of classic cars and I do get a bit weary of all the hype around the unobtainable modern super cars and do ponder on what purpose they serve. But then when I got up close to this stable of thoroughbreds I couldn’t help but be impressed, very impressed with what I saw before me. These are high quality machines and the details are really exquisite. I could have just poured over them for ages!
Mouthwatering collection of F458sLewis liked the fact you could see the engine through the glass hatch. I liked all the little aerodynamic details.The obligatory posed photo with us both being careful not to touch the merchandise!Just inside the doors was this 2002 F1 car
There were other Ferrari’s in the showroom including an FF and an ‘affordable’ F360 for ‘only’ £90k. I wasn’t feeling brave enough to wander around the showroom, limiting myself to a quick peep in at the F1 car.
My favourite was this F812 Superfast with its deep black paint and cartoon proportions
After a coffee in town, I spotted that there was a classic section across the road. That was more like it! A 250 Pininfarina Coupe for a mere £799k, a pair of Maserati Fruas and a late Testarossa. Unfortunately I couldn’t get a good photo but anyway it was nice to have a bit of Italian magic. Back to the MG next weekend!
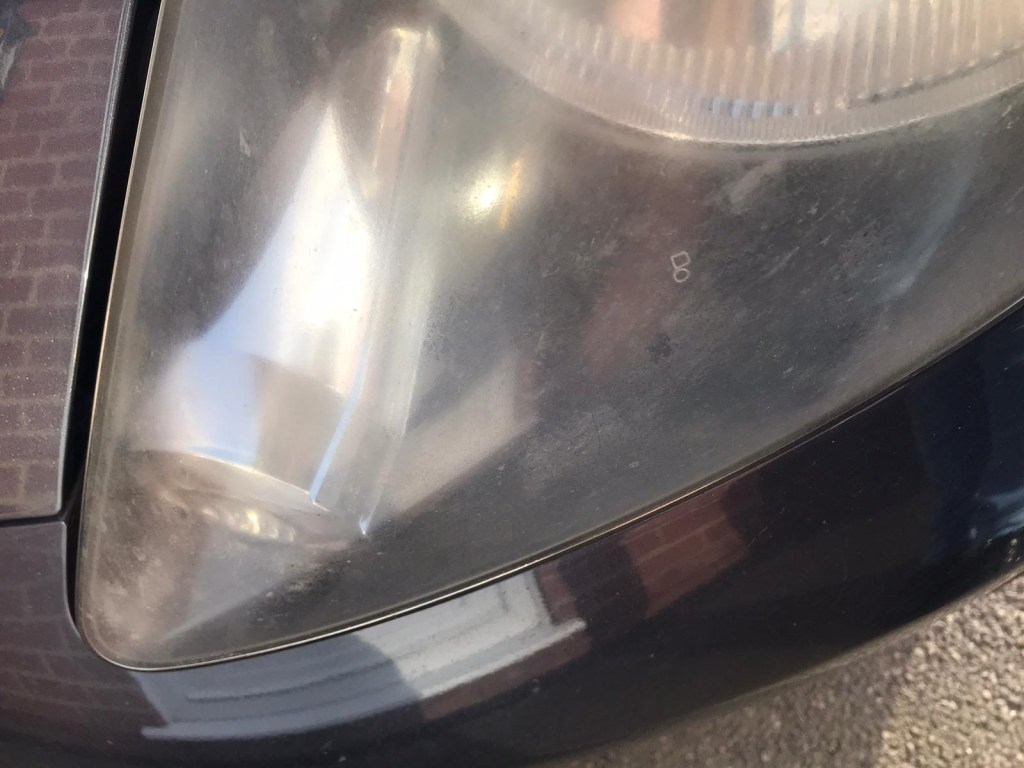
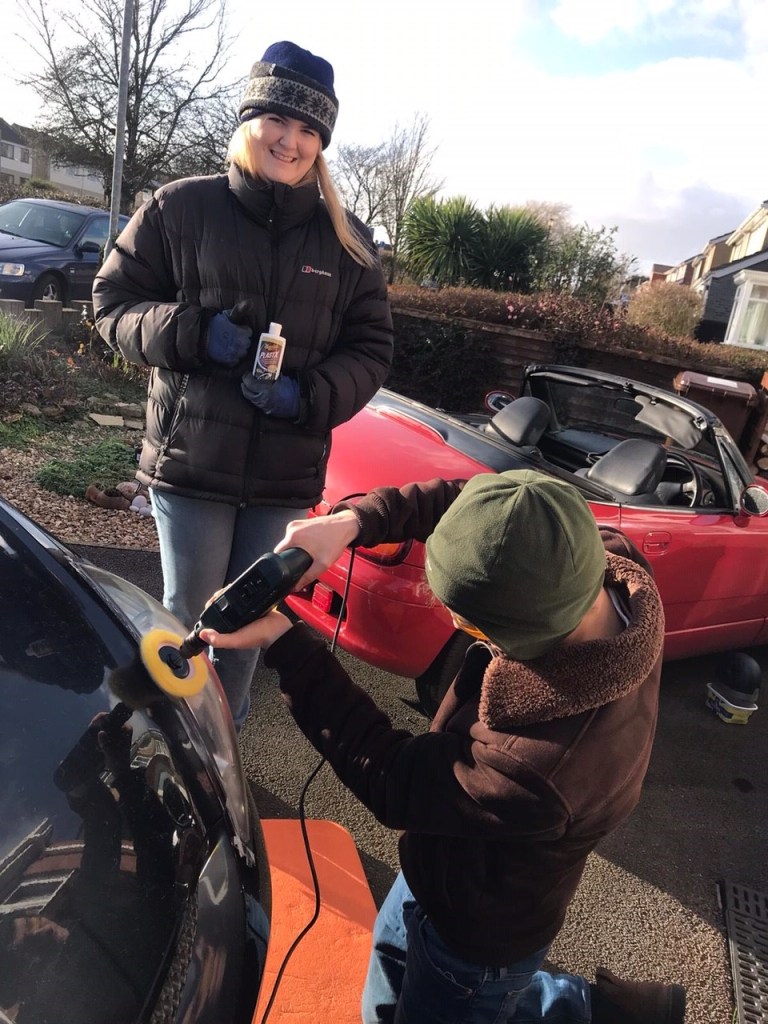
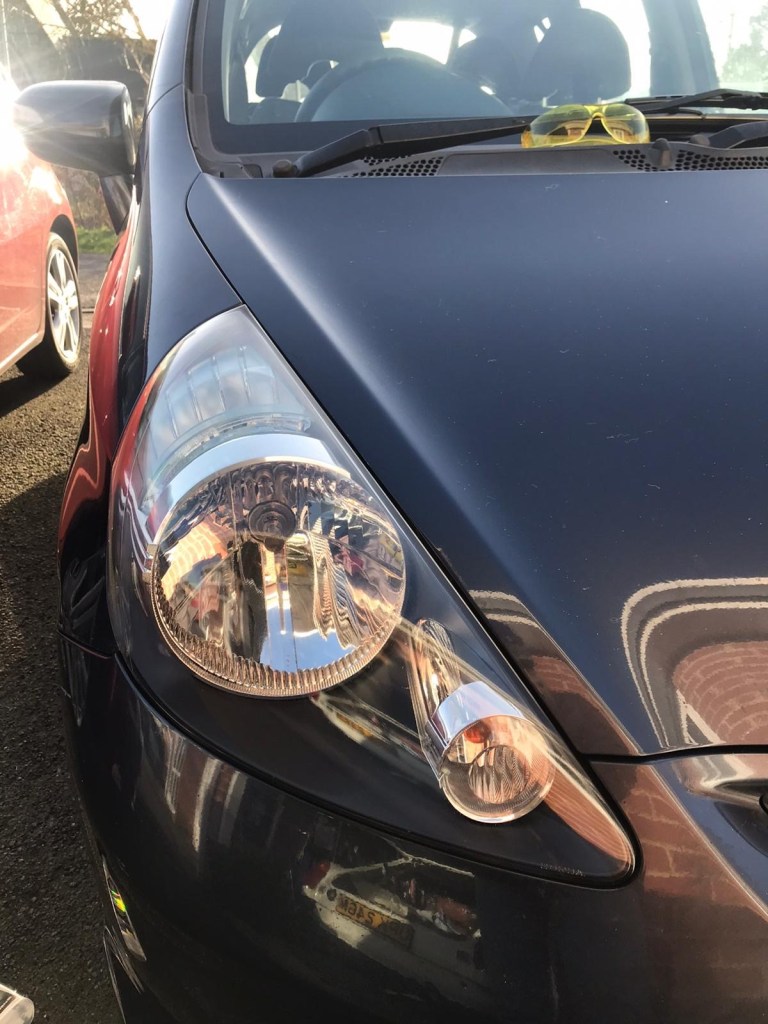
Bit of a different day today. I did a little bit of work on the MG, more on that later, but I also tackled a couple of jobs on the Japanese fleet, namely my Suzuki Cappuccino and my daughter’s Honda Jazz. Both these vehicles had badly hazed headlights and I have never had a go at them, being a bit worried about ruining them. As the recent Jazz MOT had noted the hazed headlights we decided to have a go at cleaning them up using Meguiar’s single step kit (bought from Halfords). The kit comprises a fluffy disk which fits onto your drill, a polishing compound and a couple of abrasive pads with grades from 1800 to 4000 – that’s fine! Ellie and Matt (the BF) were both present to help with this job and I let them do as much as possible once we had proved the concept as I wanted them to feel ownership of the finished result. The instructions were really clear and it all worked very well as you can see from the pictures below. Apparently they can fade again in as little as 12 months so we are not kidding ourselves, but as a quick freshen up of the old Jazz, it was impressive and easy to do. I used the abrasive pads in one area where the compound didn’t remove all the marks and it worked alright, but I would be nervous about using this on any large area because you sort of have have to make them worse for them to get better if you know what I mean, so a risk of messing it up.
Ellie getting stuck in to the work
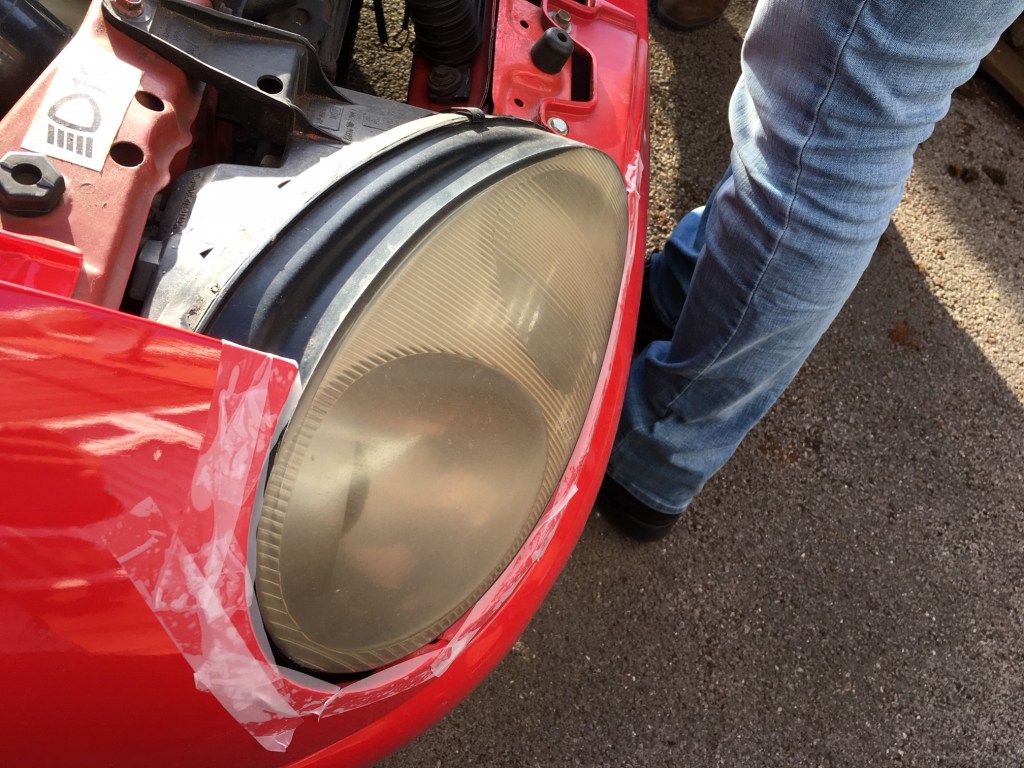
The lights before we got started
Matt also had a go with the power tools
Look at those sparkly headlamps
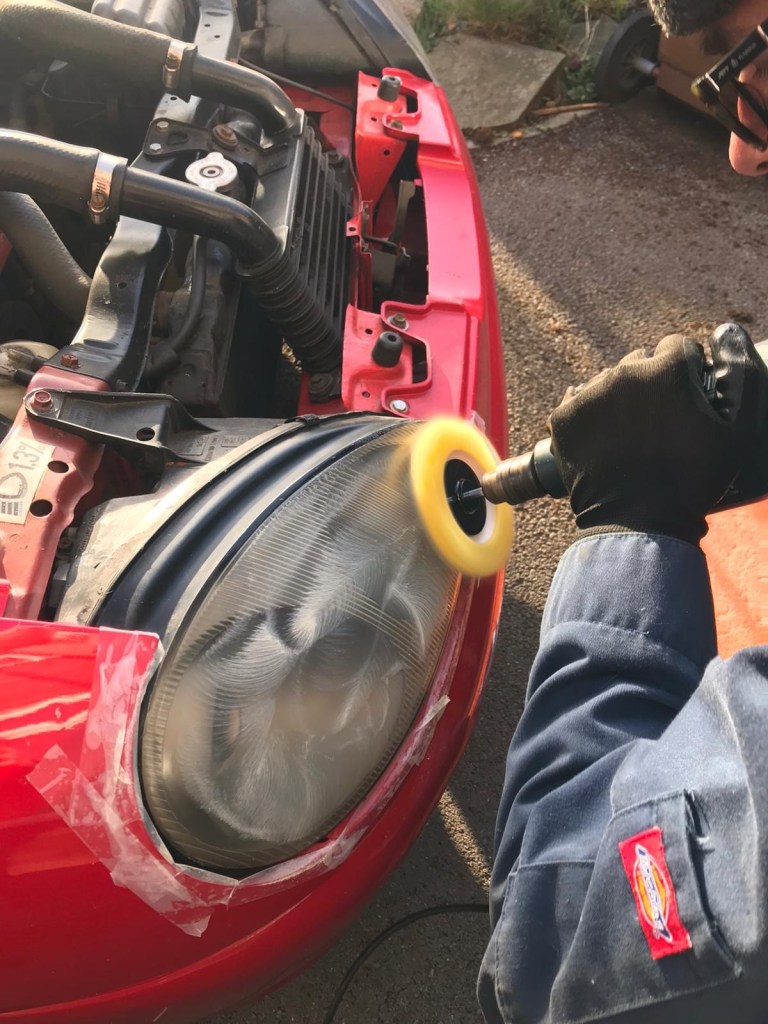
As this job had gone so well on the Honda, I moved the crew onto the Suzuki Cappuccino which had one really badly hazed headlight and one that was in reasonable shape. We decided to give them both a polish and the difference was remarkable – see the pictures below
This headlamp was really hazed
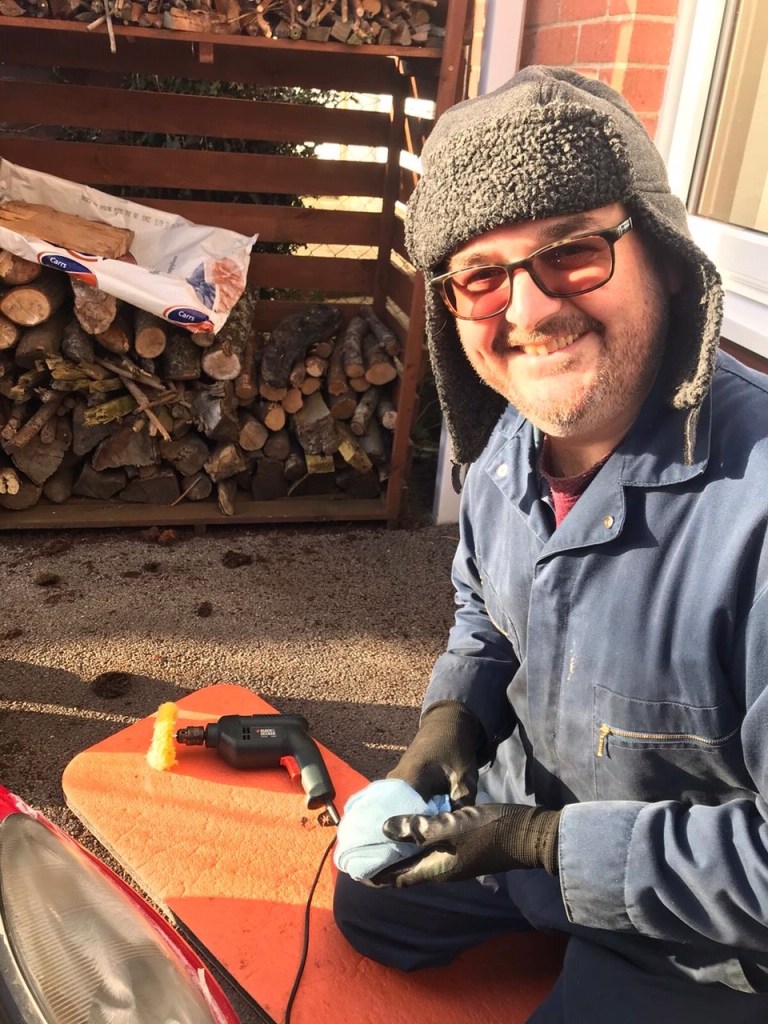
Showing the young ‘uns how it’s’done
Look at that willing crew!
Acutal polishing action
It was a cold day – hence the hat
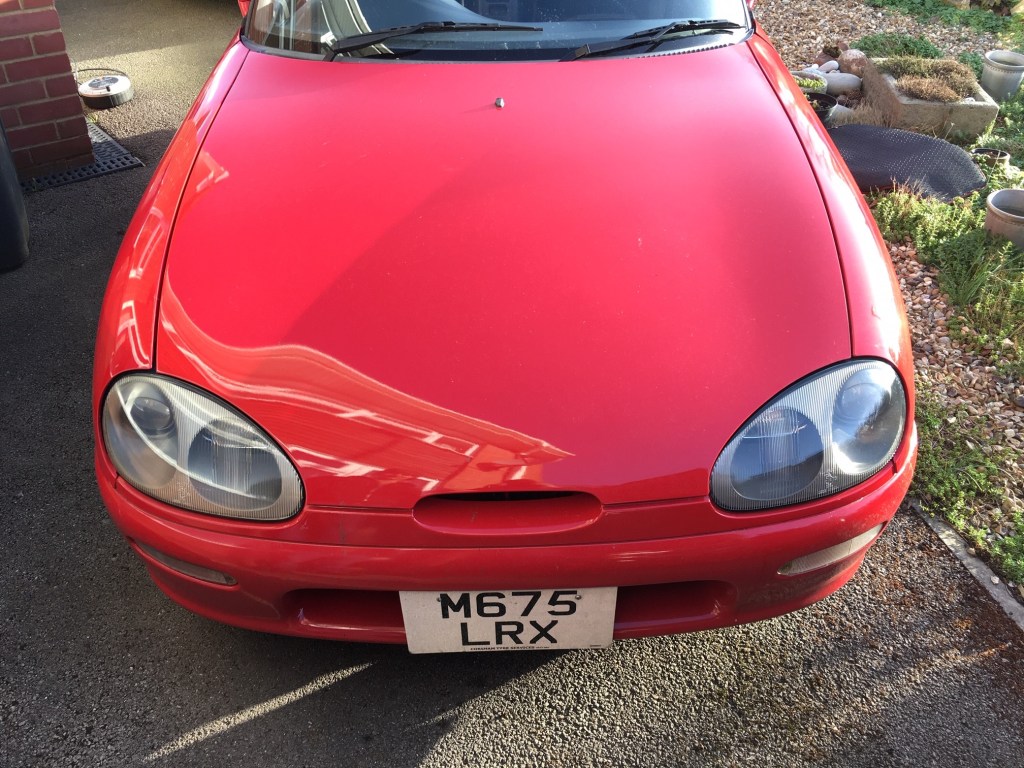
Transforms the front end of the Cappuccino
So two good jobs done. Back to the MG…. I had received the long awaited parts order from Moss so I just tackled one job, but it is an important one as it releases a whole sequence of work. This was to fit the adjustment pillar to the alternator. The original had inconveniently sheared off under the slighest provocation a few weeks ago, but here I was with the replacement so I got on with fixing the alternator and fan belt. Needing a willing volunteer to put some tension into the fan belt while I tightened up the securing bolt, I roped in Matt who was happy to help. First attempt went well, but then when I went to nip it up, I managed to undo it, so Matt had to heave on the alternator again as I repeated the process. So there we are, we are clear now to install the radiator, heater controls and pipework and thereby get close to completing the cooling circuit, prior to charging the system with a suitable coolant. A nice day, decent progress across the ‘fleet’ and some good company. Rounding off the day, Matt and I cooked a chicken Korma and Saag Aloo for the family and it was well received.
A whole day opportunity to progress the MG presented itself on this gloomy January Saturday. Helen was off to meet a friend but was kind enough to help push the MG up the drive before she left. Although I had jobs to do, I had ordered parts the previous Monday and as they hadn’t arrived, was hoping they would turn up during the day.
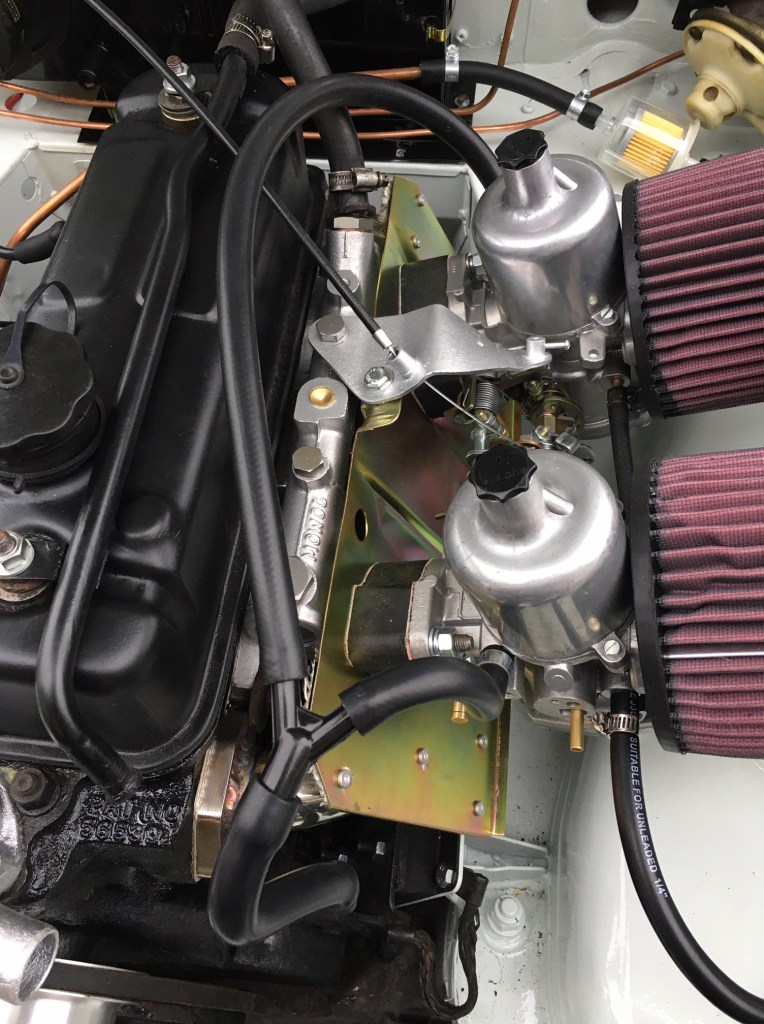
First job of the day was to fix the throttle cable to the Carbs using the original parts which I had sorted from the strip down. I did give the cable bracket a coat of silver paint just to cheer it up a bit before I fitted it. I used some leftover paint I had and warmed the bracket up first with a heat gun to speed up the drying process. That seemed to work well. Fitting the cable was a fiddly job and I haven’t got the tension right yet nor a return spring on the throttle pedal as it turned out. I think I need a second person to help with this, one being at the pedal end and one at the carbs. Anyone free…?
The throttle cable connection – needs a bit more finessing
Next job was to complete the fuel line to the carbs. This has been vexing me for a while as I couldn’t work out from the parts I had left how the pipes connected. From studying the old fuel pipe I worked out that I had to cut a new rubber pipe in two, making one short length and one longer piece. Using these two pieces of rubber pipe and the final length of copper pipe I was able to work from the filter down and around the carbs and into the the fuel inlet on the front carb. I was pleased to have solved it, but it’s a bit weird that the kit claims to have all the parts whereas you actually need to cut the pipe. A mini-milestone this as it now represents the achievement of a line all the way from the fuel tank to the carbs, so a nice step forward towards engine start.
As the parts I had ordered had still not shown up I had to find something else to do. Mindful that the loom was still looking a bit unfinished under the bonnet, I turned my attention to seeing if there was anything there that could be connected. Last week I had pulled the rear loom into the engine bay (via the underneath) and tied it up with bailer twine. Taking a look at this, there was an obvious bundle of wiring to which the rear loom connects and I thought it woud be easy to just match the colours and connect it up. However, while one or two connections went in nicely, others did not want to play ball and rather than force them, I left it and will research on how they are supposed to connect (maybe a question for the MG Facebook group). What I did dig out a bit more successfully was the fuse box which I gave a good clean in the parts washer (Dishwasher), mounted in the engine bay and then connected up using a diagram from an MG forum. I’ll need to replace the fuses, as they all looked a bit ancient (and one was blown).
The fuse box fitted and connected
Back side of the fuse box
With Helen out, I was able to use the dishwasher as a parts washer
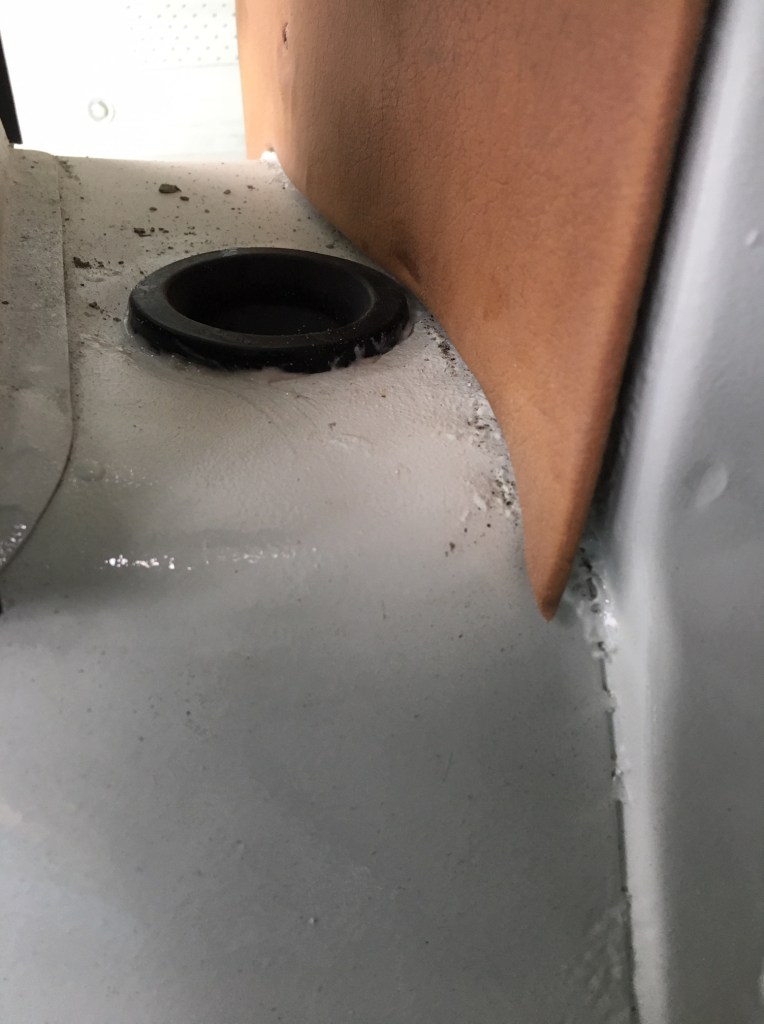
Still no sign of the parts so I was content to just potter around doing little jobs, so I repainted the steel heater pipe which runs across the rocker cover and the radiator stays. I then tackled a horrible job, but a neccessary evil. This was fitting the rubber grommits to the oil cooler pipe around the radiator shroud. I had to cut them to get them on (yes, Dad!) as I am sorry but they just do not fit over the ends of the pipes. This was a tedious job of having to push a little at a time through the very tight gap. Anyone who can work these over the pipe ends, I salute you sir/madam.
It was worth fitting these grommets as the pipes had already had to scratch the black paint
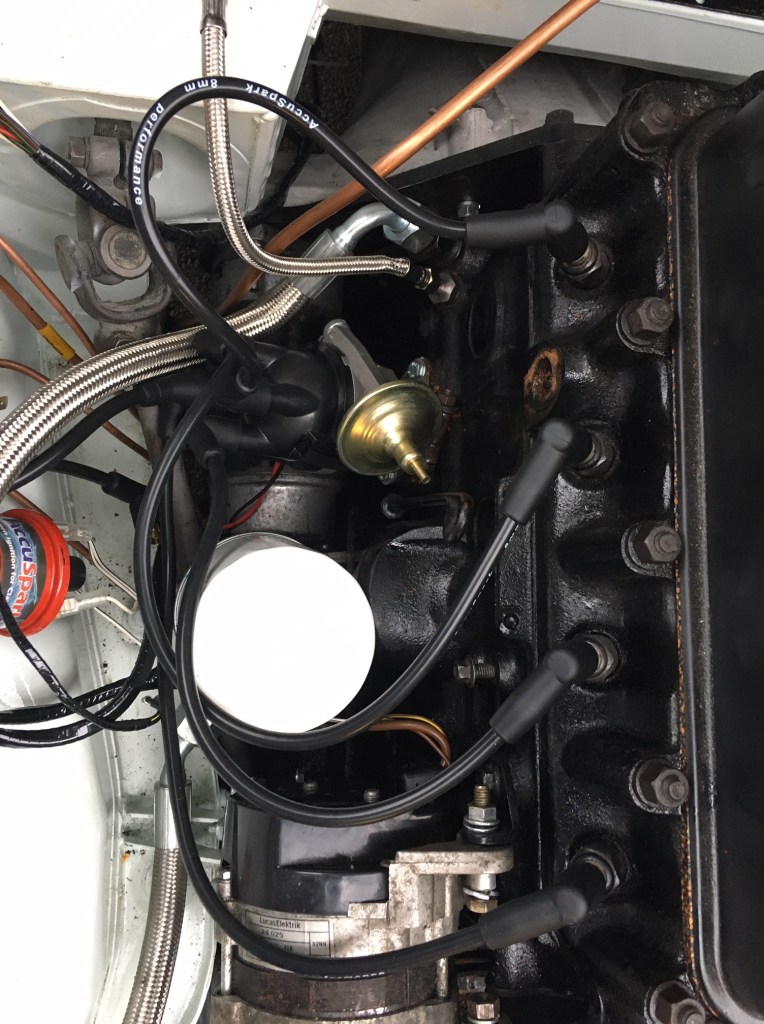
With the parts still not arrived, and with enthusiasm still in abundance, I decided to have a look at the distributor installation. I set the engine to Top Dead Centre (TDC) and then trying to interpret the distributor instructions (which were not clear), I proceeded to fit the HT leads in the firing order, starting with number one lead being the one where the rotor was facing. As previously posted, the HT leads clash with the oil cooler pipes on the MGB – or at least until I find a magic solution to this, so it was a fiddly job. I managed to plug all the leads in including the one to the coil, but I suspect it will all need to be rechecked before I risk spinning the engine over. I took a photo as a record of the first attempt.
I decided on black HT leads as per factory rather than racy red ones
Helen had sent a text saying she was on her way home, so as we had a few other things to do, I started to put stuff away after what was becoming a useful day of chipping away at the list of jobs. When she arrived back and asked how I had got on, I said not that well as I was waiting for parts to arrive. ‘What, these?’ she said, pointing to a fat looking envelope from MG Hive buried in our filing pile. Hmmm. In fairness, this was only the breather hoses and not the main parts delivery, but it did spur me on to fit these before I packed up for the day.
So the carbs are now connected to a nice new fuel line and breather pipes
Just for laughts I had my parcel directed to ‘Relentless Duck Restorations’
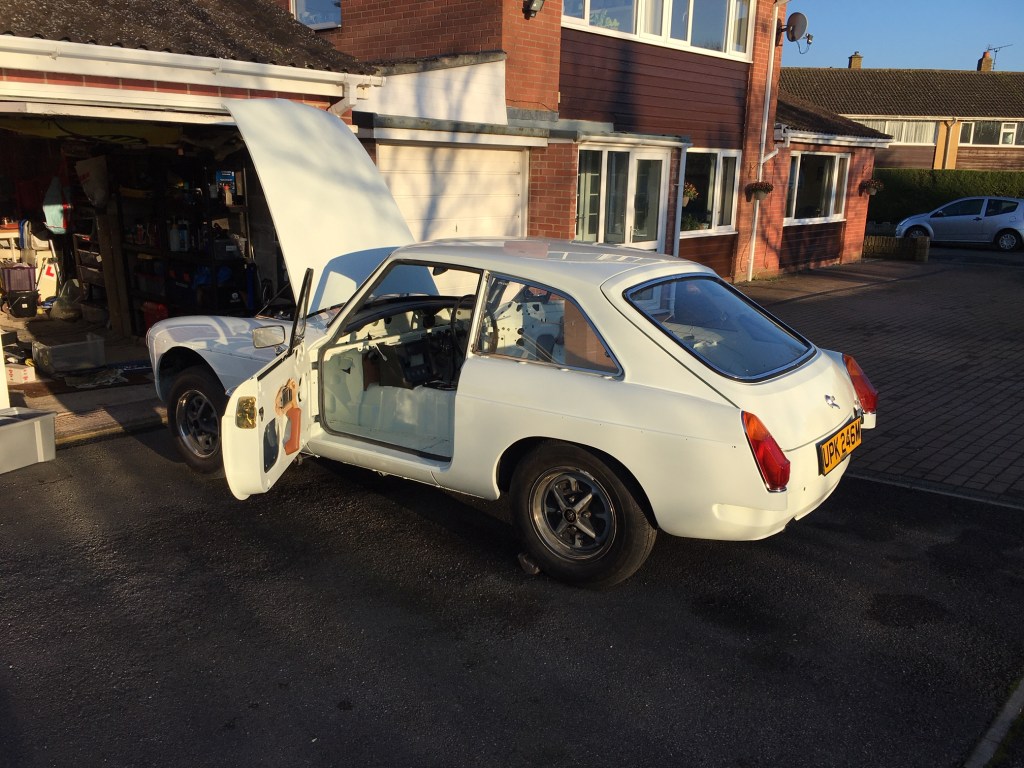
Pushed the MG out into the cold January air after Church today. It was a funny day weather wise, definately cold without enough sun to feel any warmth and threatening clouds scudding overhead. Continuing to focus on the engine start I decided to offer up the dash panel. I could continue to engine start without the fascia in place, but unless I connect up some of the gauges I am not going to know stuff like oil pressure, so I think its worthwhile.
I wrestled with the dash a bit which is ungainly due to the gauge fitted and their respective connections (temperature capilliary tube and oil pressure pipe) and I recalled how it was a bit of a struggle to remove. The pinch point is around the steering column: The bottom of the dash straddles the steering column while at the top is a bracket which goes under the dashtop where it bolts into place. The clearance is really tight, but with a bit of a heave I managed to get it in, then realised I had scuffed the dash slightly around the steering column. Later that day a friend would ask ‘You didn’t cover it with a cloth then?’. To conclude, the dash is in, held by a single bolt for the time being and ready for its connections to be threaded through into the engine bay.
I had also placed the new seats in the car earlier. Note, placed, not fixed. The seats are in the car purely to make a bit of room in the house while we have a room decorated. I can’t fit the seats just yet because I am missing a seat runner. I bought the car partly stripped down and on stripping it down I found a runner was missing. Unfortunately, the runners are handed and I am not sure if the missing one is left or right. A logic puzzle to ponder sometime soon, but not critical to my current engine start mission. I am undecided whether to leave the seats in or take them out when we have our room back. I think they should probably go back inside the house for now as they will be in the way as I fit out the interior after engine start is achieved. They will need to be protected from the cat who sees any such object as a legitimate scratching post.
My friend John appeared, bearing an oversized spanner which fits the engine pulley bolt which I was after so I could set the timing on the distributer. While he was there, he turned the pulley until we found the timing mark, so that was handy. Just need to dap some paint on it now and then study the distributor instructions. Thanks John!
Plan for my next opportunity on the MG is to fit the exhaust. As I was saying to Helen (and I sure she was fascinated), I haven’t really looked at how this fits. The old one came off without much fuss so re-fitting this should be relatively easy (famous last words). This will then allow me to attempt to fire up the engine without upsetting the neighbours (such hope!).
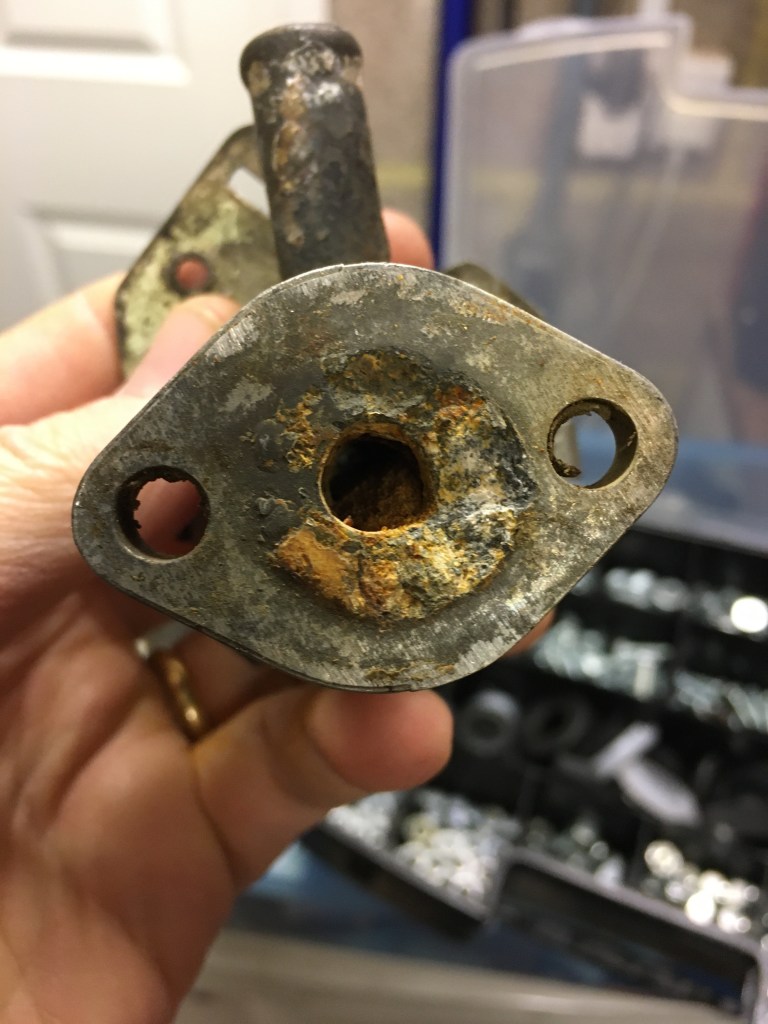
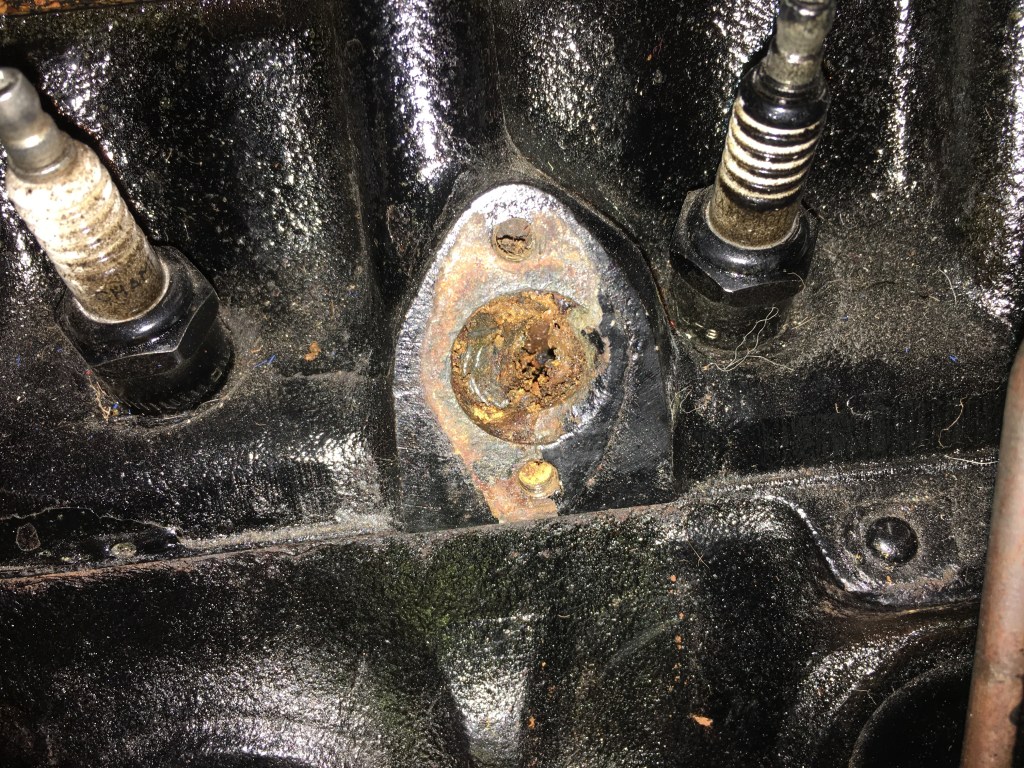
Happy new decade everyone! A mini post today to record me spending just half an hour in the garage during which I discovered that the heater control unit pipe was completely blocked with rusty crud. I found this when I was offering it up to where it is mounted on the engine and was asking myself how any coolant was supposed to flow through it when there was no hole. A quick prod with an old screwdriver proved that the crud could be dislodged fairly easy and this was also the case with the aperture into the engine water jacket.
I wondered to myself if this was possibly the reason the car overheated when I first fired it up shortly after buying it, and why the fan was set to be on the whole time. What a bodge by the previous owner, but satisfying to find this problem and be a step towards sorting it out.
The heater control with crud opened up This is where it attaches to the engine block. I have removed the crud but it really needs a bit more work. Don’t know how I missed this when I had the engine out!
And finally, this is me, my better half and my in laws at a New Year’s Eve party last night
A good amount of time on the MG today. After dealing with the ironing pile (yes), I pushed the MG out into the winter sunshine and got stuck in. I warmed up first by fitting the rubber bung (or grommit if you prefer) over the hole in the transmission tunnel which is used to access the gearbox filler. This was stiff as hell, but a bit of soap helped it into place.
The tight space within which to manouvre the grommit into place
I then jacked up the o/s so I could access the fuel pump which I am sure you are all fed up hearing about. Well the good news is that it is now fitted snugly into its clamp, the wiring loom connections are on and the rubber pipe which connects the pump to the copper pipe under the car is fitted. So hurrah! It was a bit of a faff, but all it needed really was a bit of patience and perseverence. I think Mum-in-law’s Christmas cake may also have helped as I used the last slice to sustain me.
What’s better than cake, coffee and classic cars – don’t answer that!
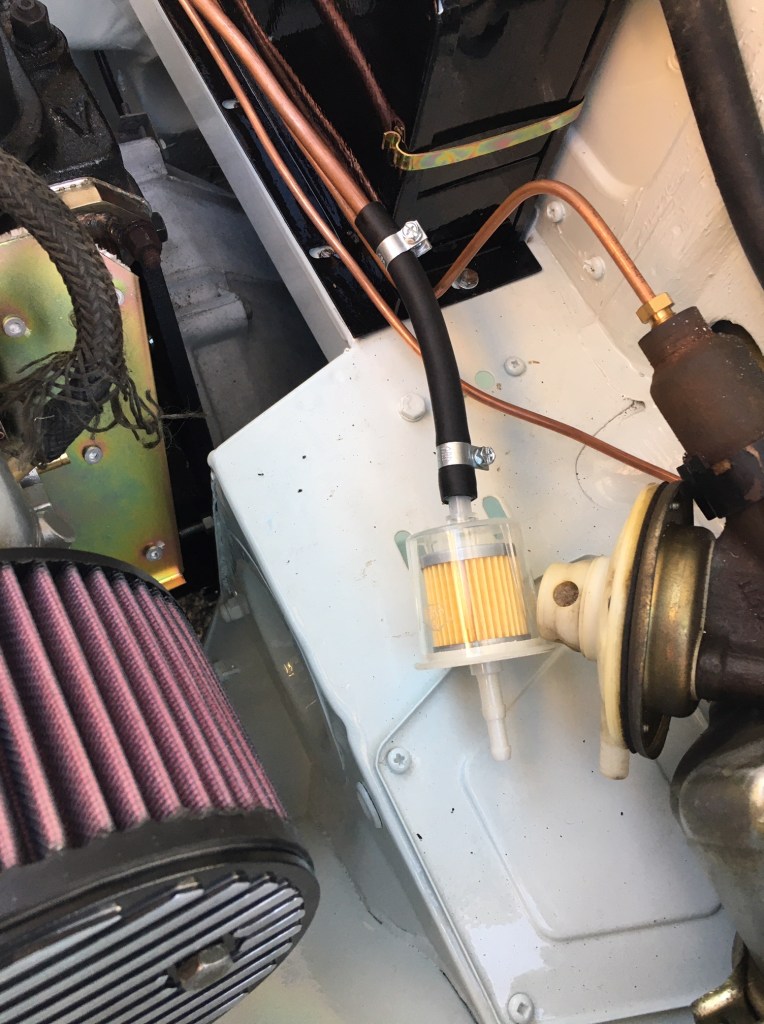
I later spent some time routing the copper pipe around the engine bay. I wasn’t aiming for final fit, I just wanted to route it some more and try to figure out how to connect the fuel line to the carburettors. I have posted an enquiry to a FB group on this now, so just waiting for replies so I can finish this off [Post Blog note – response received, the mystery fittings are the overflows – who knew? I’ll need to buy some more pipe for these]. I did fit the fuel filter, so this is definately progressing.
The fuel filter fitted – just the last length to the carbs to sort out now
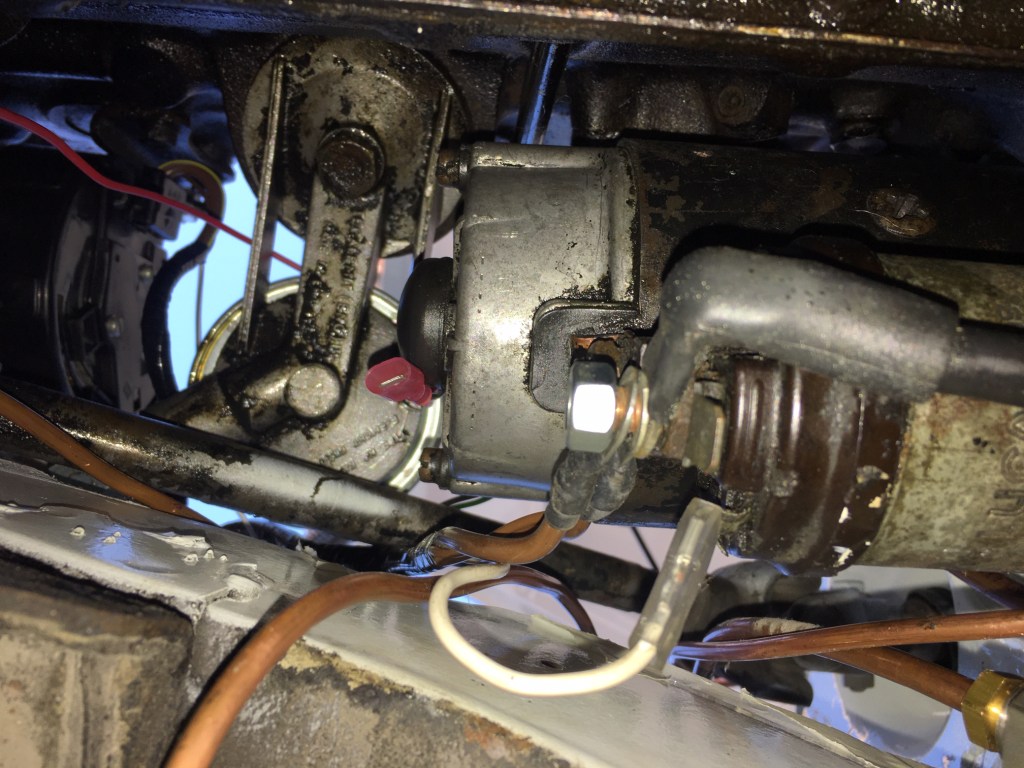
With the car jacked up I was able to connect the wiring loom to the starter motor, one more job towards my engine start milestone. This was easier than it looked with as usual the loom falling easily to hand and some helpful guidance on the interweb as to what goes where.
End of the starter motor showing the connection locations
I then turned my attention to troubleshooting the pesky alternator bolt which had sheared recently when I was attempting to tighten the fan belt. Good news folks, I was able to undo the bolt from the other end. I had anticipated having to use a stud extractor or some such, but I hadn’t realised it would be so easy. I do need to replace the adjusting pillar as its called because its a special item and I dont have any long enough bolts to put anything in temporarily. As ever, the SC Parts catalogue is well illustrated and shows the part clearly. I will probably order from Moss though, sorry SC! Sorting the alternator is critical to the build as not only does it need to be working, but I want to be certain its on right before I commit to fitting the radiator which will be largely in the way of it once fitted.
Having gone as far as I could go without answers from FB and ordering new parts I had a go at installing the wiper mechanism. This is semi-critical to engine start as it is better to have this all installed prior to the fascia being re-fitted because its easier to access. This should have been an easy job, but I was thwarted by what is either a parts misorder or pattern parts being different to the original. Briefly, there is a chrome collar which sits over the wiper drive rod and this sits on a rubber collar chamfered in the opposite direction so they fit nicely together. Except they didn’t. On inspection of the original vs. new part, the new chrome collar was significantly longer, so I could not get the securing nut to bite on the threads. I have ended up re-using the pitted old collars and will investigate further what this is all about. What I have learned in this process, is that if it isn’t fitting, then something is wrong. I have learned not to be frustrated or to attempt to ‘make it fit’ as that ends in disaster. While doing this job, the chrome collar fell down the vent in the scuttle panel. ‘Ha ha’, I said to myself, ‘I ‘ll get that easily enough.’ Mmm. It had fallen in an awkward place and my trusty magnetic tool pick was having no effect as the item was not magnetic. Hmm, time to thing again, so I went to open the inner vent which these particular MGB have under the fascia. But the vent it blocked by the half fitted wiper mechanism cable which is dangling in the way. So I have to release that to get to the vent opener, to allow me to scrape my knuckles putting my hand through the vent into the duct to retreive the collar. Then I did it again when I fitted the other side. Sigh. At times like this, I am sure the MG has a sense of humour. To prevent further incident I fitted the grille which goes over this vent AND the mesh that goes underneath.
The wiper mechanism – it looks fitted at least
So that was most of the day, I did also stick a washer and a nut on a bolt which secures the steering rack. For some reason Gavin the painter hadn’t wanted to fit that one, but with my box of nicely sorted imperial nuts, I was able to sort that out while I was there.
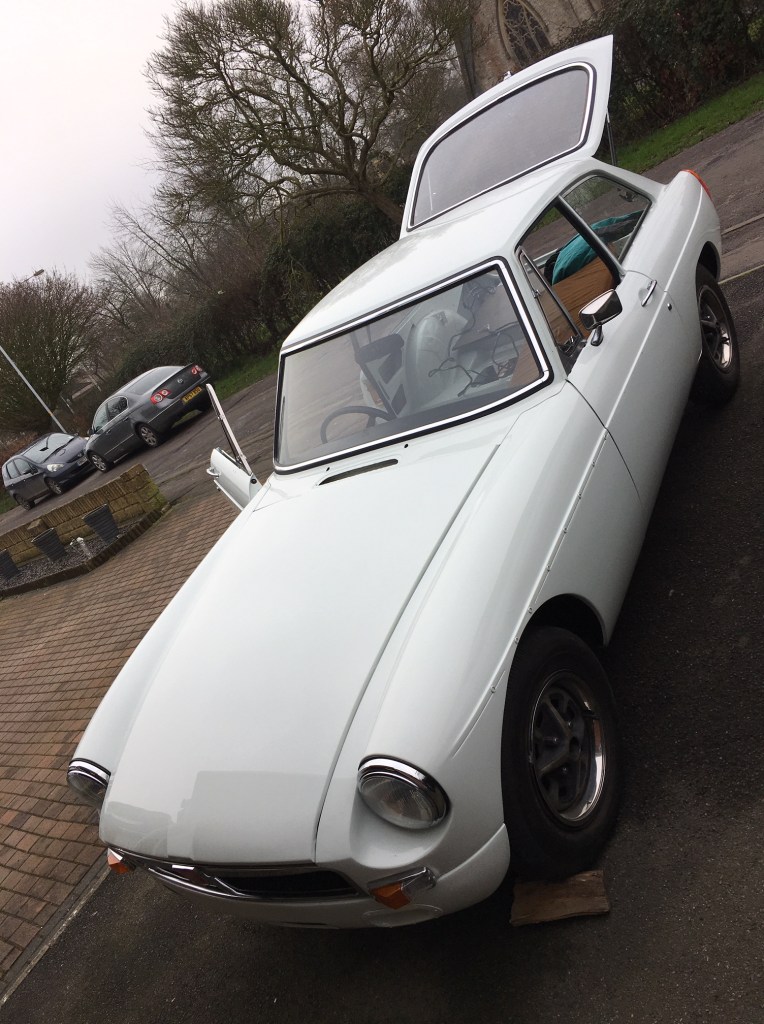
It was a really beautiful day today. Sunshine all day long and I had ages on the car. I took some photos of the car on the driveway, just because it looked so good in the low winter sun. Hope you enjoy them below.
This isn’t Instagram…
…but its a fine looking machine…
…in the winter sun #nofilter
Two things to finish off the day – first, hanging the MG wall plaque on the garage wall – a present from a colleague and my Mum – they both bought me the same thing! Secondly, a quick blast in our Suzuki Cappuccino. As it was a dry day, with no salt on the roads, it was too good an opportunity not to have a quick sprint up to the motorway and back. The Cappuccino gets light use all year round, but I am choosy when I take it out in winter due to its vulnerability to corosion. It was a nice way to end the day with the light just fading, the sky tinged with pink and 8500 on the tachometer.