A clear, bright, cold April morning was rapidly warming up as I pushed the MGB out onto the driveway. Today I was intent on changing the float chamber gaskets (more on that later) and there was half a chance I would get some help from my friend John to sort out the horn button which would in turn allow me to finalise the steering wheel installation. While poking around under the bonnet I decided to fit the metal cover over the pedal box as just one more job to do. It fitted nice and snug and is another step towards finishing things off.
I was just finishing removing the air filters when I had a call from John confirming he was free to come down and help. So I halted work on the carbs and John and I worked on the horn button. This was more challenging than it should really be. Because I am using a non-standard wheel (wooden), with a non standard boss, we couldn’t just stick it all together. Instead we had to measure everything to get the indicator stalk, horn ‘pogo stick’ switch, and cowl all to work together. Unfortunately, there was no obvious way to fix the ‘pogo stick’ so John ingeniously modified the indicator stalk bracket to mount it. This was going well until we realised with a dry fit that we had not taken the indicator cancelling cam into account. Drat. John persevered and as I write this the whole assembly is mounted, but pending the araldite hardening off before we finish it off. So a really awkward job which is now nearly done thanks to John.
The pogo stick switch mounted on the modified bracket. Note steering column now at correct height
While this was going on, I investigated the stiff steering by removing the inspection plate on the steering column and taking a look. The plate came off easily enough and the shims that came with it too although the surface rust on them suggested little oil was in the rack itself. So, pleased with myself I started merrily pumping gearbox (the correct) oil into the rack and it was taking a lot as it was so thirsty. Or so I thought until John spotted a pool of oil appearing on the drive, which we traced to a split gaiter. Drat again, but entirely my fault, although it does explain why the steering rack was dry. So, parts to order before I can completely resolve the stiff steering.
With the plate removed I could pump oil into the steering rack
A final bit of fun was discovering that the steering column could be raised from where it was mounted by loosening the bolts and sliding the column on its slotted mounts. I had not spotted this when I fixed the steering column and I had been finding the wheel uncomfortably low. Now sorted in about 5 minutes – easier than selling the car because I couldn’t fit in!
And away she goes back into the garage pending new steering rack gaiters
Oil is vital stuff, finding its way between all those rapidly moving metal bits that make the engine go vroom and preventing them from welding themselves together. However, sometimes it escapes from where its supposed to be and then it makes a big mess. Well this evening I was able to look under the bonnet of the MGB to check on some oil misting that has been present since recent start ups. It’s nothing severe, but clearly not right and I wanted to see how bad it was since my first drive a couple of weeks ago. On opening the bonnet there was a tell-tale mark, running transversely across the underside of the bonnet originating from the front of the engine. It wasn’t as severe as the other day, but there is enough to make a mark and not something to ignore. However, I quickly realised that this particular evening I wasn’t going to be able to get under the car to see where the oil was coming from, having checked all possible locations accessible from above where it might be coming from. The pattern of the misting point towards it being linked to the main pulley which as it goes round and round is I think throwing up the leaked oil. Everything points towards the sump, pulley seal or timing chain cover. So a fairly big weekend job there to work through these areas and resolve.
While I was looking, I did a general look around for any other leaks. In the near side chassis rail was some petrol. Not a lot, but a recognisable quantity. Oh dear. I felt around the fuel pipes which were nice and dry and then under the carbs. Aha. Under the front carb (the float chamber) it was damp, so this points towards a seeping seal. Darn. I have had these carbs apart when I was troubleshooting them, so its going to be my fault, but I suspect the float chamber cover seals are not, well, sealing. They were a pig to refit, so I’ll have the carbs off and look/replace the seals as they may well be mangled. Seals are £1.46 from SU (plus £5 for postage!). I am pleased to have spotted this at least before the leak got too bad!
Petrol leaking onto this chassis rail
While looking at the carbs I took a good look at the throttle mechanism as at present the car does not idle nicely all the time. The cable is a little slack but the the spindle returns to the stops so that is not sticking. It could be the mixture as I have fiddled with this in trying to set the carbs up. When I can grab an expert for the day (Hi Dad!) I’ll set these up from scratch, but in the meantime, I took the spark plugs out to see if they would give me any clues as to the mixture. The photos are below in front to back order. I’m going to leave this to the experts to comment, however I think its fair to say the carbs are not set up right!
Plug 1 front carbPlug 2 front carbPlug 3 rear carbPlug 4 rear carb
The off-side chassis rail was also not pristine, having oil spotting around it. I wiped this up and looked for a possible culprit. Feeling under the oil filter, my fingers felt oil around the bottom of the union with the oil cooler pipe. This union is a beast of a with a 15/16th fitting. It a double nut thingy where you have to hold one nut while doing up the other so I had my 15/16th spanner on the oil pipe fitting and an adjustable on the filter end and was able to tighten it by a good quarter turn. I am hopeful that this will stop that leak, but it will need to be checked next time I run the engine.
I tightened up this joint
Finally, one of the grill stays had a loose fitting. No idea why, the grille hasn’t been off for ages, but I might as well fix it while I am here. The threaded screw was a bit second hand looking, so I looked for a replacement. I found a bolt the same thread which was a bit long so I shortened it with the hacksaw and along with a couple of washers it fitted nice and snug and that was one less rattly thing on the car!
Tightened up this grille stay
A busy half hour on the car, but some steps forward which is always good!
I have organised myself around something I am going to call a ‘sprint’. I am borrowing from the Agile Project Manager handbook and have set myself a short term goal to get the engine started. I am therefore focussing all attention on this milestone and ignoring everything else. This is probably a mis-use of the term ‘sprint’, but if it works as a way of completing this rebuild as a series of goal-based mini-plans, then I am going to do it like this. We will see. This sprint started earlier in the week when I made a list of all the things I needed to do to get the engine started. I ran this past my friend and historic racer, Rob. I say historic not because he’s old, although he is, but because he campaigns historic racing cars. Perhaps classic would be a better description. Anyway, he practically rebuilds his car each weekend, so I checked the list with him over dinner and got it signed-off so to speak. Thanks Rob!
So this Saturday, finding myself with some time, and although officially off-sick with a cough/cold, I opened up the garage and pushed the MG out into the watery December sunshine. I started by fitting the newly purchased pulley from Moss. I had been struggling to get the first pulley I had bought to fit, but taking a close look at the catalogue, I realised I had ordered the wrong type of pulley. Straightaway it was obvious that this was the correct part, as the pulley lined up with the main one at the front of the crank. I fitted it with new bolts and anti-rattle washers. With the pulley in place, it was logical to fit the alternator as this would then allow me to pop the fan belt on. The alternator went on easily enough – to begin with… I had cleaned this up when I stripped the car, and had kept all the bolts and washers, so it really was a case of reversing the removal process to get it fitted. All good, until I went to fit the fan belt. The fan belt went on easily enough. I put the car in gear and rocked it to turn the pulleys and feed the fan belt onto the alternator pulley. All good so far until I went to undo the bolt which allows the alternator to slide along its stay to tighten the fan belt. To be fair I went straight for my full-sized socket set and with the first turn of the ratchet the bolt sheared off. Damn. To be fair, this part had stayed on the car (it wasn’t stripped) so it was being moved for the first time and I didn’t use any release agent. Not having much time, I just photographed it and will ponder on how to remedy this situation. Some good news in that the electrical connections for the alternator fell easily to hand and it only fitted one way, so easy-peasy.
The next job, fitting the oil pressure gauge pipework was a bit challenging too. I couldn’t quite work out the fittings, and the engine-end fitting looked a bit mangled. As I looked closer, I could see the outline of a larger bolt but as I had painted it over when I sprayed the engine it wasn’t very clear. Learning from the earlier sheared bolt incident, I took a bit more care with this fitting and gave it a liberal spray of freeze unlock product, left it a minute and then gently broke the bond with a well-fitted socket. It came out nicely. I had bought the correct fittings from Moss, including the braided hose which feeds up to an adapter, bolted to the bodywork, from where the pipe to the gauge connects. I will fit this pipe when I install the dash which is on my sprint list. All in all, a good job.
Next on the list was to install the coil. Now I had recently identified a clash of the coil bracket with the 4-way brake junction from which I had carelessly routed a new pipe over one of the coil bracket bolt threaded holes. So I loosened the brake junction and with some gently manipulation, I was able to rotate the whole thing enough to clear the bracket hole without tugging the brake lines much out of their alignment. With that cleared I was able to identify the spade connectors from the loom, referencing the wiring diagram and get them connected up to the correct terminals on the coil. With the alternator in place, the oil pipework coming along and the coil fitted, the engine bay is starting to look busy! While the car was out I got the radiator (a new item) out just to see how it fits, but I won’t fit it until I have sorted out the sheared bolt on the alternator bracket.
Last job today was to fit the centre console. It might sound a bit weird, but I had ordered a new one (the existing one was butchered by a previous owner and did not have the correct switch slots). Rather than have it knocking around the garage, I fitted it which will allow me to place the switches where they need to be as I build up the dash.
So a busy and reasonably productive time on the MG today and a break from lying on the sofa in front of the TV feeling sorry for myself and binging on Netflix. Weather was kind too, a mild December day, although we are still at that time of year where by 3:00pm it is starting to grow dimmer. Such a short day!
The alternator electrical connector
The sheared bolt on the alternator bracketHer
Installation of the coil, looking down
Here is the oil pressure gauge pipe – looks smart doesn’t it?
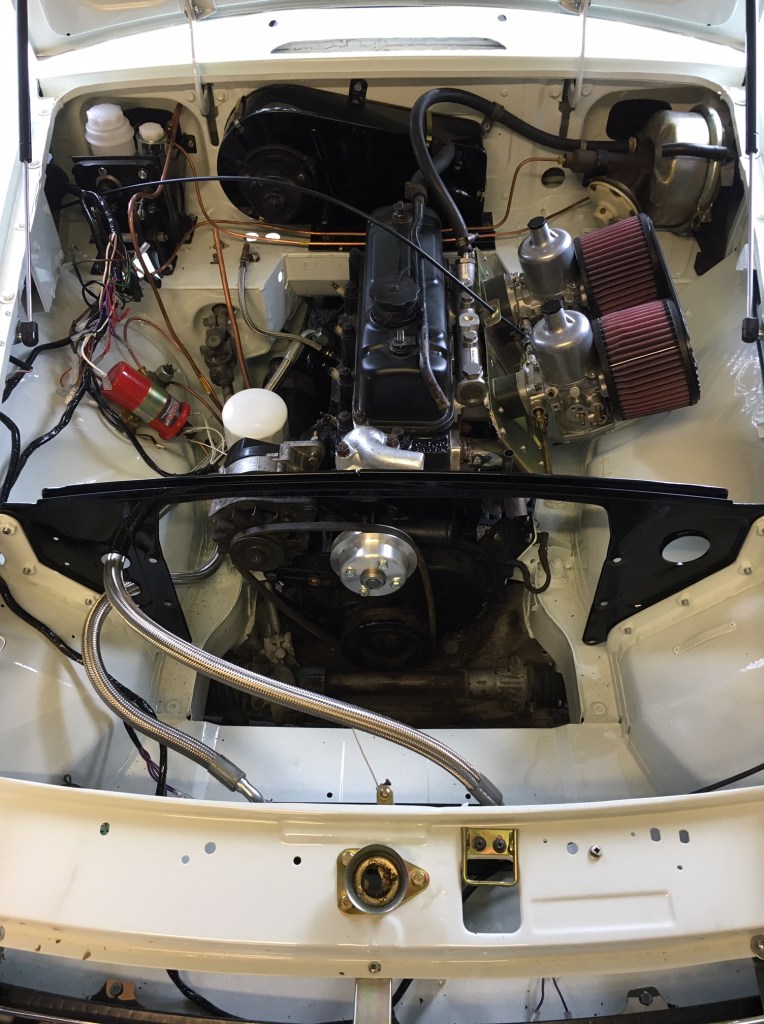
The engine bay is building up nicely with these little steps
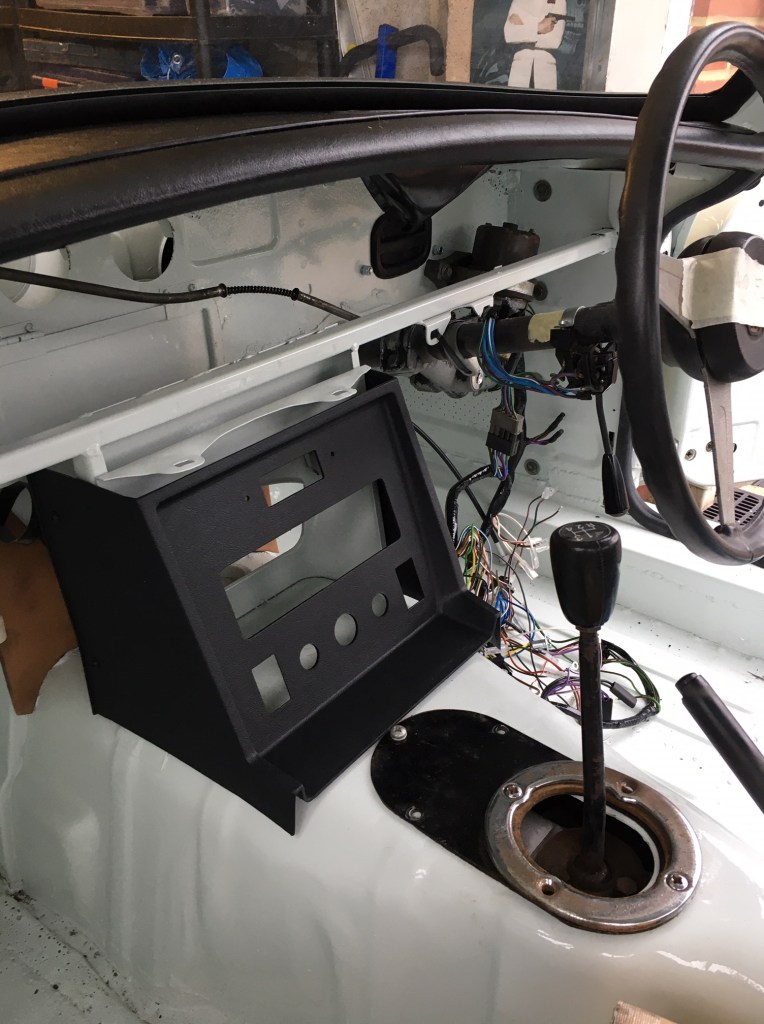
New centre consule installed
This is my engine start check list – complete with ticked off items, corrections and oil stains. Also a shopping list to the side!