28 Feb 21 Milestone Day – we have a brake pedal

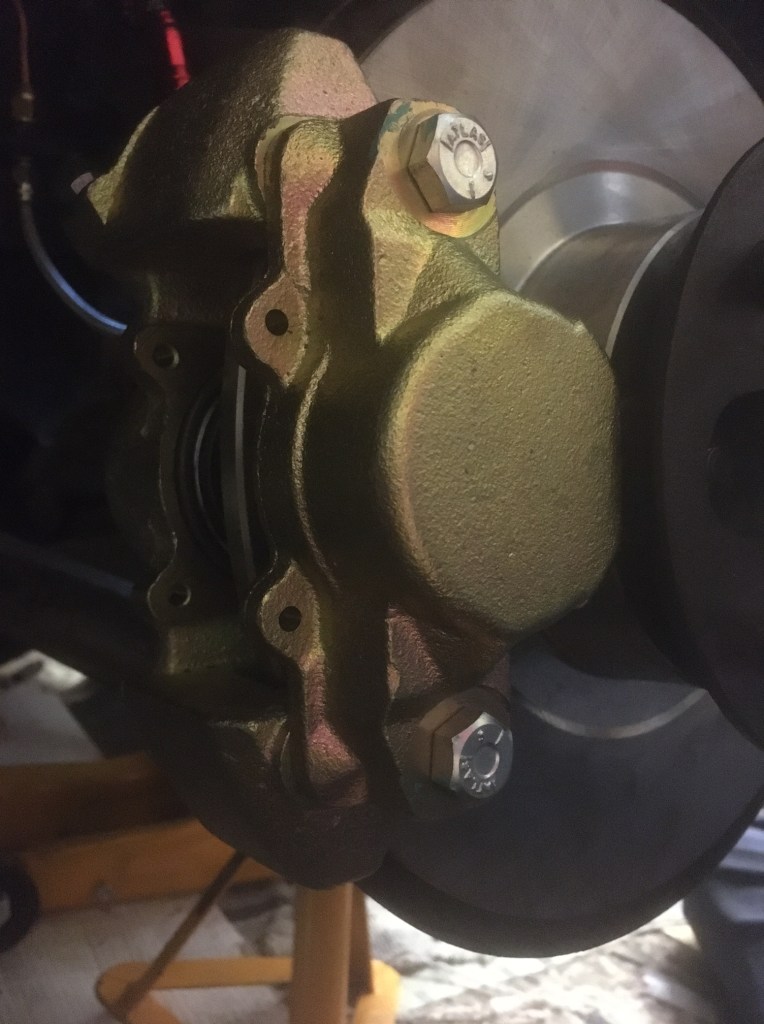
Actually it was yesterday. Another sunny February day and it was time to fill up the brake system for the first time since I had replaced all the brake lines and the entire front brake assembly, disks, pads and callipers. I had a Gunson kit to help and my friend John was on hand to direct me from a suitable distance on the driveway. The Gunson kit uses pressure from the spare tyre via a rubber tube which goes into a bottle filled with brake fluid with an outlet which fits to the master cylinder. Had to inflate the spare first, which was flat obviously. We also jacked up the rear, removed the rear wheels and verified that the bleed nipples were okay. With the kit connected up, the fluid started to go down as the brake pipes were filled. I was watching at the back of the car, and the level was going down but no fluid. Then we spotted the rapidly growing pool under the engine bay. We had a leak at the four-way junction with one of the joints leaking fairly well. There followed some rapid reaction work with me in charge of sluicing the spilt fluid before the nice new paint melted while John disconnected the four way junction for inspection. I should mention that we did first just try nipping it up but to no avail.

The four way junction nor the line had no catastrophic issues, but John’s keen eye had spotted a little gunk in the fitting and on the threads. So we conducted a clean with some WD40 and a rag, blowing it out with an aerosol air canister. After some careful reassembly and re-tightening of the four lines to the junction, we recommenced filling operations. No leaks this time. For each brake in turn, we connected a length of plastic tubing to the bleed nipple and opened it up. I watched the flow and when the bubbles had cleared, I nipped up the bleed nipple. So far so good.

Moving to the front of the car, we again jacked it up and removed the wheels. The n/s side went smoothly enough, all new components, so it was a dream really. On the o/s, a little fluid was weeping from the connector between flexible and hard pipes but this was nipped up promptly enough. A prod of the brakes confirmed we did indeed have a brake pedal. As it was now getting on in the day, we decided to call a halt there. Further testing has identified that it is soft on the first push, then firm, which I think means there is still some air in the system. A quick browse around the internet suggests that the pipes into and out of the servo need to be bled and possibly also the junction connection at the rear which splits the fluid to left and right. This will be sorted out soon. However, all in all, excellent progress and a milestone reached. The car now starts and stops!

So to today, Sunday, and I was on my own, so a little pottering was in order. First job was to investigate the misfire which has been plaguing the MG lately when running it up. The carbs are not in tune, I have a plan in mind for the that, but it has definitely been running worse and worse. Taking a look around the engine bay, I discovered that the vacuum advance pipe was looking very sad. Being rather on the long side, it had drooped onto the exhaust manifold and basically melted. So I snipped off the mangled bit and fortunately there was plenty of length to make a nice route to the inlet manifold. Next I investigated the distributer, and as a non-expert, the one job I could do myself was to swap the distributer cap which on inspection was a bit rough looking with the contacts worn. So I popped in the new one which came with the electronic distributer and this saw an immediate improvement. I was tempted to just pop the new distributer in but as this is quite is quite fiddly, I put it off for when I have a longer go and have taken some advice. Instead, I did a couple more jobs on the dash. First, I fitted the rev counter properly. I had lost one of the knurled wheels that fit to the studs and hold the two brackets. Miraculously, I found it on the driveway yesterday! That saved a £5 order to a specialist (apologies to the parts market, I need plenty more bits honest!). Then I moved to the n/s to fix the dash properly. Having done the o/s earlier in the week, I knew how this went and it was straightforward to fit this. With the centre nut also fastened up tight, the dash is now looking right, albeit I still have a few switches and the vents to install. As I had to lie on my back in the footwell to do this, and with a mind to future required jobs, I got out the new carpet set and lobbed the footwell carpets in and the boot carpet while I was at it. I am not quite ready to commit to carpeting the MG, but it was good to see the set and acquaint myself with the different parts.

25 Feb 21 A whole day of stuff

I took back a day that work owed me today and had a whole day on the MG outside in the warm February sunshine (yes, really!). Here is a quick synopsis of the jobs I completed.

  1. Fitted new bolts to the n/s brake caliper replacing the ones that got mangled when removing the old calipers. Fitted the tab washer while I was there
  2. Fitted interior light to the centre console ready for wiring up.
  3. Scavenged the heated rear window warning light from the old loom and old centre console
  4. Connected up the speedometer cable to the back of the gauge. To do this I dropped the dash off its single bolt to get access to the back of the gauges
  5. Fixed the ignition switch to the steering column. No more fishing around in the footwell for the ignition switch.
  6. Fixed the o/s corner of the dash which enabled me to hoist the dash up to its correct alignment and therefore to be able to slip a temporary bolt across to mount the steering column to the dash for the first time is a couple of years! To do this I lay on my back with my head in the footwell and my feet sticking up into the boot. The things we do!
  7. Fixed the o/s door light switch and discovered that the n/s looks a bit mangled (hence why Phil had not wired this before)
  8. Removed the rear wheels, rubbed them down, sprayed them with primer then a top coat of satin black. They turned our better than the brushed hammerite on the front wheels! This now completes the set of wheels, which are now a lot tidier than they were, understanding that this is temporary cosmetic fix-up pending a more permanent selection of wheels for the project. And because Dad kept pestering about their shabby appearance
  9. Cleared out the interior of rubbish, tools, nuts, washers and grit!
  10. Fitted grommits to the footwell aperatures
  11. Found the rear bumper brackets, but sadly discovered they are very rusty and one had a seized and sheared off bolt. I had considered fitting the rear bumper and had given it a once over and reckoned it would do as a temporary solution. I think now I have discovered this, I will keep it bumper free at the back as originally planned. Need to figure out how to light up the rear number plate without having the over-riders on the bumper to mount them on (I might just not bother…)
  12. Tidied up the garage and sorted through the spares.

Being a lovely sunny day I had quite a lot of interaction with passers by with most people saying something encouraging. One older lady remarked that an old boyfriend of hers had one in the 1970s – cute! Another family walked past when I had the engine running to put the car away. As we know the engine is not in a good state of tune at the moment and I had cranked up the slow running to be too fast and was on choke, so it was revving at about 2750 rpm and popping and banging. As I glanced behind, the lady had her hands over her ears. Sorry about the sports exhaust

20 Feb 21 N/S brake progress

More positive progress to report today. Following the breakthrough yesterday of removing the caliper bolts, today I was unable to remove the old caliper, and install the new disk, caliper and pads. The most challenging aspect of todays job was actually getting the split pin out on the nut which secures the wheel bearing assembly mounted on the stub. This turned out to be very awkwark, but was really just a matter of patiently working the little fella out with persuasion from the pliers and a hammer. There wasn’t much of the head of the pin to grip on and course its all covered in slippery grease. Anyway with a bit of tapping from below and a bit of tugging at the top I managed to wriggle it out. Removing the wheel bearing, parting the disk from the hub and all that went fairly smoothly, albeit a messy job due to the grease. I have admiration for the speed at which the boys at Kwik Fit do this sort of work, although I guess they have air guns, ramps, loads of space and a supervisor on their back to speed them along. I was taking ages, but I was listening to an F1 Podcast at the same time and just taking my time. Fitting the new disk, caliper was easy enough. I re-used the old bolts, but have ordered new from Moss as they were a bit mangled on removal yesterday. So when they arrive, I’ll swop them out and that will be a job well done. I decided to also replace the split pins but not having any in the Parts Department, I had to walk into town to Halfords. Helen joined me and we had a pleasant walk incuding a takeaway Cafe Nero Cappuccino on the home straight. Back home, I fitted the split pins and the grease cover and that was that. Before packing away, I quickly gave the wheel a coat of Hammerite Satin Black. I had previously rubbed this wheel down so it just needed brushing on. As per the o/s I decided after much nagging from Dad to do a quick tidy up of the wheel as it was off anyway, as a temporary measure pending a decision on wheel choice for the final build. I might have to save up for the Minilite wheels I really want, but for the moment, these old Rostyles will do to move the car around. So I am now clear through to filling up the new brakes pipes with brake fluid, bleeding the system and having working brakes!

19 Feb 21 A tale of two bolts

It’s a story with a happy ending today as I have just witnessed big Mark releasing the two calliper bolts which were preventing me from replacing the front n/s brakes. A few weeks ago I had done the o/s front brakes and it had all gone alright. However, when I came to do the n/s the brake caliper bolts (there are two) I could not remove them. The n/s calliper looks original, so what we have here is something that has been in place for over forty years and did not want to budge. My attempts to undo the bolt had involved using some freeze spray and a socket and bar. The problem I was having was that the bar was just springy and I only have a light domestic hammer so all I was doing was bouncing the steel around. So I called Mark…

To be clear, Mark entered our garage via the front, while I stood well away, so we were Covid secure throughout. On his first visit (yes there were two visits) he tried a spanner and lump hammer to try to get the bolt to budge. All that happened was the spanner (one of mine, and not of best quality), just turned around the bolt. Next he used a chisel to try to rotate the bolt with a couple of thwacks on the edge of one of the flats. Sadly this did not work, so he agreed to come back with some more serious kit.

Visit two, a couple of days later, and Mark arrived with a professional socket set and a G-clamp. He found a good fit with a 15mm socket and fitted the bar. Then he used the G-clamp to hold the socket onto the bolt end as additional security. He gave it a couple of exploratory thwacks, but wasn’t happy with the bar still flexing excessively. So he used a large ring spanner fitted over the end of the bar and put it under tension to reduce the bounce. A couple of more meaningful blows from the hammer and we started to see actual movement and the first indication of progress. And that as they say, was that. The second, lower bolt came off in much the same manner and I am now clear to complete the replacement of the front n/s brakes over the weekend. Thanks to Mark, a local friend who didn’t mind squeezing down the side of our garage to undo the bolts on a rainy February 2021 while I looked on in awe. We all need a friend like Mark.

7 Feb 2021 MG Restoration recap

February already, and for those who were saying that 2021 had to be a better year than 2020, its wasn’t looking that way for the first few weeks with a guge increase in the rate of infections, hospitalisations and deaths. Having said that, across the family we are gradually having our vaccinations and what a giant leap forward that is. I had my vaccination through a curious querk of my job. I work as a Programme Manager for a company owned by Guys & St Thomas’ Hospital (GSTT for short) in London. Once GSTT had vaccinated all the clinical staff, they rolled out the jab to non-clinical, and after that to affiliated companies. I hesitated initially to go forward, as I didn’t want to be seen to be jumping the queue (being only 50 years old), but conversations with colleagues persuaded me otherwise. Their view was twofold – firstly, that the Trust had surplus batches and were not permitted to send them back or give them to anyone else, secondly, that if offered, you should accept the vaccination as part of ‘doing your bit’ towards everyone being vaccinated. One less jab for our local GP surgery to do. Anyway, a brief round trip to St Thomas’ Hospital saw me heading home with a slightly sore arm, but feeling really grateful. London roads were deserted which was a bit odd, but of course completely logical.

On the MG front, I was being barracked by a couple of friends on a Teams call on Friday who were asking why I hadn’t finished the MG yet. I replied that it hadn’t really been the weather for it. One of my friends asked “Is it snowing in your garage then?” Thanks Rob. The truth is that busy-old life just keeps getting in the way, what with the 9-5 itself, walks in the countryside, ironing, picking up the shopping, keeping on top of Church stuff like PCC meetings via Zoom, cooking and so on. However, I have made some progress with the MG, as reported here.

Gearbox loom – a leftover from fitting the loom was the part which runs to the gearbox to operate the overdrive and reversing switches. I decided on a recent dry day to jack up the MG, crawl underneath and feed the loom through. I tied a piece of string to the end of the loom so I could pull it through all the right places. Weirdly, it was quite hard to work out which switch was which and yes, you guessed it, I got them the wrong way around first time. this is where the loom is always worth listening to (stay with me) as it usually wants to ‘sit’ in the right place. If you are having to drag it around against its will, chances are you have it in the wrong place. My spacial awareness isn’t great so you can imagine that with a gearbox having a front and a back and a car having a left and a right that when I was under the car I was getting confused about what was left, what was right and which way was up! Add to that my hat kept falling off and my gloves were on and off (where did I leave them this time?) and it all took a lot longer than it would had it been a pleasant spring day with a friend at hand to help. Anyway, its in, just needs testing now.

I also purchased a revotec electric fan, a conversion I’ve been planning and that required assembly inside the house before I can attempt to install it. I have Phil the electrician in mind to connect it all up, once I have the hardware installed. I am stalling on installing this just now since I need to commit to draining the coolant and I want a good day to do that outside and have to buy the new coolant ready.

I did have a second go at the n/s front brakes today. Having pushed the MG into a position in our single garage where I could get the n/s wheel off, not the usual way it is parked, I jacked it up and placed axle stands. With the wheel off, I gave the caliper nuts a good 20 second blast with freeze spray to try and budge them (I had previously failed). Unfortunately, today I was still no longer able to get them to budge. I can get a good grip with a 5/8″ socket and bar but there is just no movement back or forth with the nut and I can feel the bar flexing rather then the nut yielding. So that was a bit disappointing, but perhaps this needs an overnight dosing (I’ll give it another spray) and another attempt tomorrow (after work!). Alternatives would be to apply some heat, but I’m not sure whether that would be effective (hasn’t worked for me in the past) and there is always big Mark, although that would have to wait until after lockdown. So a bit frustrating as sorting the brakes is key to the next few stages of the rebuild, so its holding things up. I have left the car jacked up to make other attempts so at least the job is ready to be tackled.

A snug space for working on the brakes

1 Jan 21 Don’t go braking my heart

I hope that I finish the brakes before I run out of song / TV titles I can use for a play on words. Following a seven mile walk this morning with the lovely Mrs T, this afternoon was dedicated to completing the brake job started a couple of days ago. My set up was a little different as I was keen to keep the garage door firmly shut against the very cold weather. Not that it was much warmer in the garage when I first entered the space, although wearing my overalls and with my hands around a warming cup of coffee, things were bearable. A couple of pieces of dark chocolate may have also helped…

So today’s job was to fit the new calipers, pads, clips and split pins. A relatively simple job you would have thought, but it did take a while. The calipers are of course incredibly heavy and holding these up while you slide the two bolts through is hard work for a pen-pusher like me. However, the pads, clips and split pins went in very nicely and the disc rotated well with no binding. The hardest part of the job today, was getting the flexible hose free from where it mates to the copper cable. For some reason, my Christmas-addled brain just couldn’t work out how to dissemble the simple connecting piece. I did eventually work it out, and came up with a technique (involving winding the caliper) to tighten up the flexible connection without twisting it. All a bit awkward, but I was pleased with how it all came together in the end. Sometimes you just have to think hard – coffee always helps. With the car in the garage, there wasn’t the usual rush to get the wheel back on and the car pushed back inside. So instead I did a job I’ve been pestered by my Dad about since I’ve had the car. I gave the wheel a quick rub down and then brush painted it in Hammerite satin black. I’ve no idea how this is going to turn out, but this is very much a quick smarten up pending selection of final wheels for the car, which is someway off. If I get a reasonable result, I’ll do the other wheels as I do the brakes so that I’ll have them all smartened up over time.

I enjoyed listening to Radio 4 as always, especially Gardeners Question Time, which is a favourite, although I have absolutely no interest in Gardening. Happy New Year to you all. Here’s to a better 2021.

29 Dec 20 Braking Bad

Having received a large and heavy parcel from MGB hive containing new brake discs and callipers I decided today to see if I could have a go at fitting them. First I needed to have the MG in the right place, so I fired it up and moved it halfway out of the garage. Having started it I thought I may as well check the condition of the spark plugs because the engine is not running quite right at the moment and I thought it might give me an indication as to the whether the mixutre is too rich or something. The spark plugs looked a bit black and although this could be due to a lot of the running of the engine being on choke, it pointed towards the mixture being too rich. As I have a spare set of plugs, I changed them anyway, fired up the engine and wound the mixture back to lean it off a bit. The tuning guide suggests that you enrichen the mixture until the revs pick up, then back half a turn and I could feel this point on both carbs, but I’m not convinced. As my Dad is 30 miles away and sheltering in Tier 3, I have ordered a Gunson colortune kit which is supposed to give a definative indication of mixture. Further updates on this when the kit arrives. I also noticed some steam rising up from around the bottom hose joint, so I think the jubilee clip needs to be tightened (when it cools!).

This plug looks dirty to me

Moving back to to the brakes, with the MG halfway out of the garage, I had a good working space on the garage carpet (an old rug). I jacked up the car on the cross member and stuck an axle stand under the front suspension. I removed the o/s wheel and put it to one side. I then removed the split pins and clips which keep the brake pads in place, and rattled them free. The pads turned out to be brand new items, so that was a rare bonus on this project. Next job to tackle was removal of the caliper. The caliper on this side is ‘new’ although that makes it around 8 years old by my reckoning, so for safety I had bought new calipers. I am a brake novice, so this was all new ground for me. I undid some likely looking bolts, which were very tight, but came off with a bit of penetrating fluid and leverage. This was a job for the big boy’s socket set with all the nut sizes at the larger end of the scale. The caliper came off easily enough, and I laid all the components out on a clean sheet of cardboard. The flexible pipe hose was a bit of a faff – I ended up removing the caliper and winding it round to unthread the hose – that can’t be right. Things were now getting serious as I now had to remove the wheel hub, something I have not done before – I took my time and removed one piece at a time, photographing the order and orientation of them with my iPhone as I went. Fortunately, the wheel bearings seemed in good shape rather than greasy shrapnel, so that was a positive. The assembly came apart relatively smoothly and I was able to ease the disc and hub off as a single unit. Lifting this heavy bit of kit off the spline then left me the job of undoing the four bolts that mate them together and this proved to be a bit fiddly, but do-able. As time was getting on, I simply bolted the new disc onto the hub, reassembled the bearing, popped the wheel back on and lowered the MG to the ground. At the next opportunity, I’ll fit the new caliper, and the old/new pads and that will be one side complete!

So more work to do here – I really need to remove the new disc and give the area behind a good clean. If I can find the motivation and time, I’ll do that. In the meantime, hope you are all okay and staying safe.