19 Feb 2024 Tapping Away

A couple of updates on this post.

Off my rocker

Firstly, I have got around to the long overdue job of checking the tappet clearances. The MG has had a tapping noise for a long time which sounded like a rattly tappet, so needed to be investigated. I removed the aluminium rocket cover and removed the cork gasket. I then tried the method to turn the engine of jacking up the rear wheels and turning them with the car engaged in 4th gear. Even with the spark plug removed this was difficult and fiddly. So instead I borrowed a 34mm socket from a friend and used a ratchet to turn the crank nut on the front of the engine. Because of the lack of space I had to do from under the car. So I employed the help of Mrs Relentless Duck to watch which valves were fully open and then came ‘top-side’ to check clearances of each rocker arm. They needed little adjustment, none were miles out but I did tweak a couple, some too wide and some too tight according to the feeler gauge. This process is detailed extensively on line so I haven’t gone into great depth here, but note that the adjusting screws need very little movement to adjust the clearance.

When refitting the rocker cover, I used a snazzy new high tech silicone gasket. I discovered these when browsing online. They are reckoned to seal better than cork (not difficult) and to better endure multiple fittings. Time will tell. I had taken time and effort to clean off the gasket sealant and used sufficient when refitting so I am hoping for a good seal around the rocker cover now which was not the case previously. After all that I should have listened out to see if the tapping had gone but I forgot – sorree!

Cars and Coffee

Our local pub ‘The Pewsham’ has been hosting a Sunday Cars and Coffee morning monthly for about six months now and I went again this week. Organised by Pitstop, it’s always been friendly and this was no exception as I met up with other enthusiasts and we bonded over the joys of twin carbs, modifications, engine problems and sons that don’t listen to their fathers…! I was just enjoying myself when a call from daughter #2 came through asking me to bring back a loaf of bread for breakfast, which I gathered I was going to cook. An enjoyable pre-breakfast meet up.

Quiet please

Finally, this afternoon I completed a job I’ve been meaning to get around to for a while which was to stick the under bonnet sound proofing panels. These were a factory fit so I bought reproductions some time ago and have stuck them on using carpet glue. I pondered with roughing up the paintwork to give it a key but it’s seems so sad to do this to fresh paint. So it’s a bit of an experiment really. The main factor in whether they stay in place will be their resistance to heat as the engine bay is clearly a hot environment. I did use plenty of glue and left it to go tacky before offering it up and the using a large dry paintbrush to push it onto the metal. It’s an awkward job of course and the panels are at best an approximate fit so I had to a bit of tucking but it’s looks alright from a distance! I’m going to leave it to cure in the garage for at least a day before taking it out.

Used the wide angle to get it all in

12 March 2023 a matter of timing

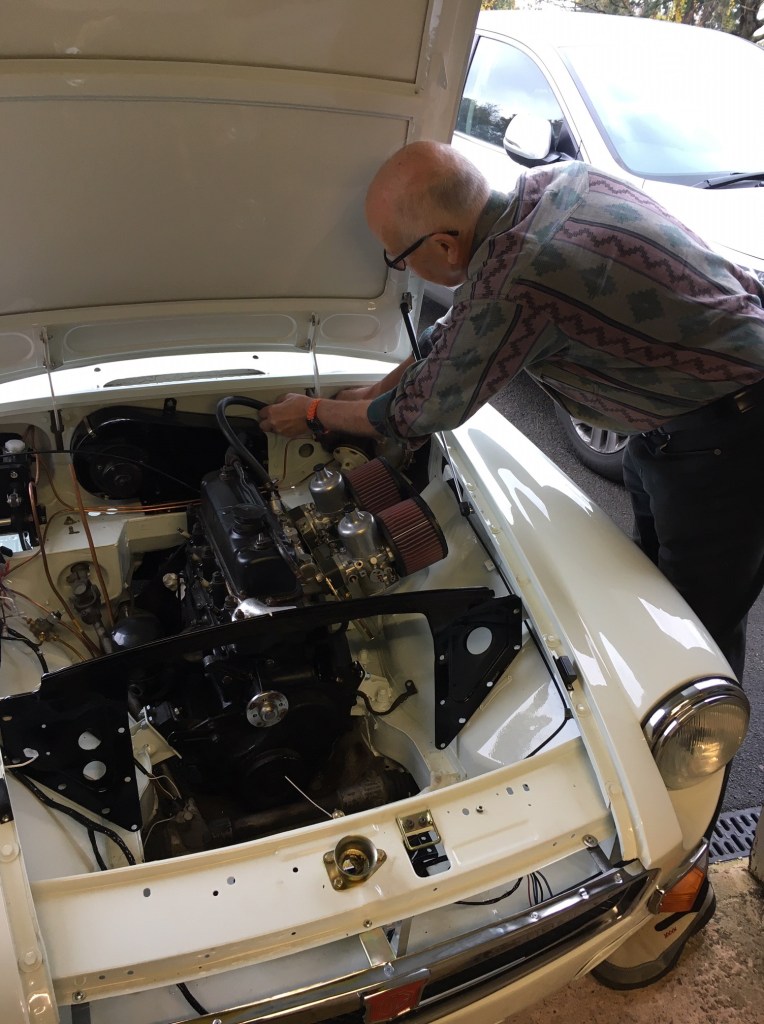
A promising conversation with my Dad this morning inspired me to have a go at getting the distributor back in the MG. My previous blog explained that I had removed it pending adjusting the timing when I discovered that the securing bolt on the clamp was the wrong way around. With that all sorted it was time to pop it back in and make the timing adjustment.

The distributor on the MGB is a fiddly fit made worse because of how I’ve orientated the oil cooler pipe work. One day I’ll loosen that connection and rotate the L-shaped connector to reroute the oil pipe out of the way of the distributor but today was about timing.

With a bit of help from Helen (the long suffering Mrs Relentless Duck), we got the distributor back in place and it was then just the tedious job of tightening up the clamp bolts which are not easily reached. In lieu of an open ended 7/16th spanner I used an 11mm ring spanner which fitted more easily and allowed me a larger turn each go. I was getting about 1/3 of a turn per placement of the spanner so it took a while…

Once I had the bolts tightened, I connected up the cables and put the distributor cap on, managing to get the clips on first time which was a miracle and then popped the coil lead and one HT lead which I had removed for access. We were ready to go for a start up!

The MG started a little reluctantly, not unusual when it’s been left to sit for a while before then smoothing out, albeit idling too fast, and I was able to back it out of the garage. However as soon as I pulled away I could hear pinking so I stopped and trickled back to the drive for an adjustment, retarding the ignition by rotating the distributor anti-clockwise.

It took two more attempts to get it right but then the pinking had gone and it was idling nicely too (not too fast as before). I drove it up to the roundabout, my standard shakedown, before returning to check everything looked alright and to tighten the clamp bolt.

I had intended to do a longer run around our local bypass but unfortunately it had begun to rain so it was time to put the MG away. Good progress and I’ll find time over the next couple of days to do a longer run and find a friend with a strobe light!

12 February 2023 Little steps

Oh how time flies – no blog entry since September! anyone would have thought I was busy [sigh]. Some progress since the last blog – I have the bills to prove it! A couple of significant garage spells have seen some overdue tasks now completed. These include such delights as wiping wipers, a heater which blows and heats, washing washers, a rear hatch with all the right seals, working indicators and correct mixture in both carburettors.

Today, as well as recording the above progress, I can report a couple of minor jobs squeezed in between studying for an upcoming exam and visiting a local National Trust property (not in the MG, too much salt on the road).

Job 1 – SU Dashpots: I am chasing down a fast running issue, and following a suggestion from Dad, decided to check and clean up the SU dashpots to ensure they can slide up and down nicely. I wasn’t at all sure this would make any difference, but it was worth a try so Matt (future son-in-law) used some metal polish to clean these up while I did another job.

Job 2 – Repair servo hose: In chasing down the fast running issue, I decided to improve the seal where the servo pipe fits to the servo manifold. The pipe end (pictured below) was very ropey and I wondered if air was leaking through there and messing up how the carbs operated. So I used a junior hacksaw to saw a length off the pipe and then refixed it to the inlet manifold.

Road Test – Matt assisted to put on the air filters and we took the MG for a spin up the road to see if we had seen to the fast running issue. Straight away we found a problem, but we are now reflecting that we may have solved one issue, but caused another. In short, we now had a pinking issue under load. We cut the road test short and slowly returned to base. I am now wondering whether with a good seal on the servo manifold, we now to adjust everything to suit that new condition. Certainly the MG was not pinking when I picked it up from Clive and we haven’t made any other changes. What do you think?

Job 3 – Wipers: Clive had ordered me some replacement wipers which were on a delayed delivery, so I had picked these up from his garage the other week. As the car was out of the garage it seemed sensible to pop these on. The wiper blades were a little reluctant to come off- they have a dainty little clip which is supposed to release them, but having been fitted approximately ten years ago (conservative estimate) they were very attached to one another. With Matt pulling and me operating the long nosed pliers (surely everyone’s favourite tool) we got them apart and new blades slid nicely into place, immediately making the chrome arms look decidedly second hand. It was getting late, so no time to clean up the arms, that will go onto the list of jobs for another day.

Before putting the MG away, Matt and I dug out the sound proofing material I recently purchased. It was a bit difficult to work out what goes well, but it was clear that this would be an all-day job with the major issue being having to remove the seats to fit the acoustic matting and carpets (not yet fitted under the seats), so that will need a good dry day and a helper on hand. An interesting afternoon all round and it was good to see signs of Spring. I need to crack on with the MG (goodness knows when) as it is required for wedding duty in November!

20 September 2021 Rear number plate on bumperless MGB

Today was a Monday, with a day of annual leave booked, and a friend coming to help me on the MG. A sunny September day awaited. I hauled the MG out of garage (no unnecessary start ups here, right Dad?) and set to on fixing the rear number plate.

As I am proceeding without rear bumpers, I had given myself a challenge as in the original set up, the number plate lights are mounted on the inside of the over riders. I solved this by observing that on my friend’s rubber bumper MGB, the number plate mount had integrated lamps – ah ha. A search on eBay resulted in a used number plate mount arriving some weeks ago which I had painted with black Hammerite and was ready to fix. The number plate itself was a metal unit with silver on black lettering which needed to be drilled. It is always a bit scary to drill into lovely new shiny painted metal, but using masking tape and progressively larger drill bits I had the holes drilled. They weren’t in quite the right place, being a couple of mm out, so I slotted them both with a circular file (I know, just shoot me). Before I put the assembly together, screws, spacers, washers and all, I used a dremel tool to clean up the heads of the screws as they were looking a bit ‘used’. Proud of myself. I mounted the rear plate and discovered it was not quite level. Out with the file again and managed to make it mostly straight. Stepping back, the installation looks good, in my humble opinion.

20 September 2021 Fitting the Carpets

I have been wanting to get on with fitting the carpets to the MG for some time, but wanted some assistance. Ashley (the son of a University friend of mine) has been working on cars and bikes since he could stand up and kindly offered to help, so we arranged the day and here we were. I had previously made a tentative start on the carpets by fitting the moulded piece to the transmission tunnel and gluing the sills. Ashley’s first advice was not to glue everything down straightaway, and also to only glue what really needed to be stuck down. This would allow us to pull carpets up if I needed to access areas in future or to pull it back if I was working in a particular area and wanted to protect the carpet. He added that through use, any areas which needed glue would make themselves apparent, and that some areas could be fixed with Velcro for easy removal.

The battery area presented some issues. Firstly I had earthed the battery to the bulkhead which goes up to the seat base and battery cover. For reasons unknown, the battery in the MGB is mounted under the rear ‘seats’. The bolt securing the earth cable was protruding on this bulkhead which would have resulted in a bulge in the carpet. So we moved the earth cable from this bulkhead to a likely looking hole in the rear of the battery compartment and insulated the cable as well. A much neater installation, and this allowed us to (sparingly) glue the carpet to the bulkhead.

Next up was to fix down the battery cover. This is fixed by five neat fixings which require a quarter turn. Amazingly through the whole strip down and repaint, four of the five fixings survived which was a surprise. Ashley used some of his detailing products to clean up the battery cover and we fixed it in place.

We then moved onto the rear arch carpets which were a world of weirdness with what appeared to be lots of excess carpet at the top of the arch and the cuts in the wrong places. We used the rear window trims as a guide to what needed to be trimmed and took the minimum excess amount off the top. Although I had both rear window trims, I did not have all the right screws, so we just put these in place with the minimum fixings and I will order new screws to finish this area off. The carpet then runs up into the inner arch, so for the present, we placed it there rather than cutting and gluing pending agreement of the final layout we settle on.

The GT version of the MGB is blessed with a micro-rear seat with a vertical seat back and mini-bench only really suitable for small children, and then not safely as there are no seat belts. I had not intended putting the rear seats back in, but am now reconsidering this as otherwise I think it creates more work in having to deal with what is left unfinished. So I will need to organise for having this recovered, or tackle it myself.

30 May 2021 Getting Kinky

Another big gap in posting due to other life distractions. Recently I had an electrician (Phil James) booked in to do some jobs on the MG. He did a cracking job, fitting the electric fan, switches in the dash and centre console and the heating rear window. Of course we needed to fire up the MG to commission the fan and this is where things began to go wrong.

The week before Phil came I had done a few little jobs including tidying up the brake, fuel and loom lines which run under the car as well as fitting the air filters. A good job done. Annoyingly the MG then refused to start and was the same when Phil and I needed it to.

Poor Phil, he tried everything and in the process sorted out the carbs which had overfilled dashpots and the rear carb where the piston was not moving freely. So we had to admit defeat on the day.

Meanwhile my Dad had said ‘it will be something simple’ and today I got to the bottom of the issue. I tried a simple test which was to remove the fuel pipe to the front carb, stick it in a bottle, turn on the ignition and see what happened. In short nothing. So I removed the rear wheel to get a good view of the fuel pump. I confirmed the connections were all good so it was a mystery until I noticed that a rubber pipe which connects to the main fuel line under the car was going through a tight curve and looked kinked. And so it turned out to be. I adjusted the curve switched the ignition on and hey presto click, click, click and fuel at the carb. Woohoo! So problem solved and another step along the way. The MG fired up and ran smoothly. I then spent some time sorting out the wiper mechanism which I had incorrectly installed. Still work in progress, but it’s on the right lines now, just blooming fiddly work. A good day’s work.

Me looking happy and relieved that I’ve got the MG going again. Onwards and upwards!

24 April 2021 Going Dizzy

Crikey, its been a while since my last post. What can I say, I’ve been busy.

Anyway, today was a good day. Recently I’ve been trying to resolve a misfire and due to my low level of competence, I had unsuccessfully tried to change the points in the distributor and managed to convert the misfire into a non-starting issue. So I left things alone for a few weeks while other events took precedence such as work, volunteering at Church, Gardening and walking with Helen. Of course Dad had been saying why not just fit the Electronic Distributor that I had bought originally but I had got it in my head that it was a horrendous, virtually impossible job. Then Thursday of this week, later in the evening instead of slumping in front of the TV, I popped into the garage and stared at the distributor. Then I reached for a 7/16th spanner and sort of offered it up to the bolts. It’s really fiddly, but I got some movement going and then the bolts were getting slack. I reached down to the distributor and just like that it came out. I was that surprised I just stared at it in my hands. How did that happen?

Buoyed up by this, today I slotted in the electronic distributor pretty easily and then just wondered if it would start. It did! I was really chuffed, and the misfire had gone, so success all round. I did have a bit of fun with tweaking the timing and having to adjust the carbs but before too long I had it idling nicely and cleanly revving, so this was a big step forward.

I spend the rest of my time pottering around. I fitted the twin horns, discovering as I connected them to the loom that the switch was live. That made me jump alright. With both units connected, they make a pleasing ‘honk’. I did give the heating controls a good check over and discovered that I need to buy one new one. I stripped the cables and connections off the old units ready for re-fitting. Completing the heater installation is going to be quite a project in itself I reckon. I then spent some time stripping the spare door that I recently bought in readiness for installing the glass from that door into my car. Finally, Helen and I sat out the front of the house with a cup of tea and a piece of cake in the sunshine. I had the usual couple of nice chats with passing neighbours and the postie who all admired the MG which was looking very bright in the sun.

Enjoying the sun

12 Aug 20 Releasing the carbs

Having established at the weekend, with Matt’s help, that the carburettors were blocked, and having consulted the ‘MG helpline’, A.K.A. my Dad, I found time this evening, with the help of my friend John, to investigate the problem. The UK was in the middle of a heat wave, one in which the temperature and humidity peaked between 5pm and 6pm arond 30 degrees, which was when we started to look at the MG. So the only right thing to do, while we wheeled the MG out, was to crack open a couple of cold beers and take a leasurely look at the problem. With John on board, this was going to be a logical approach to problem solving. Having already proven fuel would flow up to the carbs, we now knew the challenge was with the carb itself.

Step 1: Use a footpump to attempt to blow air into the carb. Result: No air passing through. Conclusion: Float/Needle valve stuck

Step 2: Remove carbs. Removing the carbs in theory is easy, its just four nuts. In practice, its fiddly, because the nuts won’t come off without waggling them to the end of the studs and then getting the angle just right. Having two people on hand is a definate advantage here, unless you are an octopus. Next challenge was to keep the carbs together with the linkages intact. To do this, we had the idea to use the plate that holds the air filters as a sort of jig. That took a bit of work to get right, but without (much) swearing, the carbs rattled free of their studs and were on the work bench.

Step 3: Remove float chamber lids. These come off easily enough, although the ‘O’ ring on the front carb hopped out of its slot and showed little enthusiasm to pop back in. Using the footpump and with the float valve open we used the foot pump again to add pressure and with a nice ‘pop!’ the needle valve on the rear carb freed itself. Surely the front carb would do the same, but it wasn’t shifting, so John tickled it with a pair of fine tweezers and before long both carbs were wheezing along in harmony at each press of the pump. How satisfying.

Step 4: Reassemble and refit the carbs. Hmm. That float chamber ‘O’ ring did not want to play ball and needs to be replaced, however, we think we teased it back in place and made a seal on both float chamber lids. We then man handled and wiggled the carbs back onto their studs, tightened them up and connected the breather pipe, fuel line, throttle and choke linkages.

Step 5: Test start the engine. ‘Hang on a minute,’ said John ‘didn’t you say that the fuel pump and coil are always on when you connect the battery?’ A discussion ensued in which John advised me against firing the engine when we are not confident of how the wiring was configured. So we disconnected the ignition switch and using a multimeter, identified what the various terminals were and then attempted to connect the correct wires. As we were nearing a conclusion on this, the rain came in heavy so we abandoned the task for the day having made some actual progress, but with some work to go to achieve sustained running.

1 Aug 20 a step forwards

I’ve had a problem with oil leaking from the oil filters area for a while and this has prevented me progressing the engine start because cranking the engine resulted in a pool of engine oil under the car. Having had several goes at refitting the oil filter to oil cooler union, today I used my brain and had Helen in the car cranking the engine over and me looking to see where the leak was coming from. Turns out the leak was from the oil filter ONTO the connection so I was looking in the wrong place. So my focus turned to sorting this connection out and following a phone call to Dad I removed and refitted it. No leak on cranking! Problem solved. I couldn’t resist cranking the engine over to fire (which it didn’t) but I did check and I was getting no spark so at least I know one of the problems to sort out.

This lovely engine bay will sound nice too one day
Oil everywhere but where from!

Back to earlier in the day and ongoing (and off going) saga of the doors and their glass. I had previously fitted the quarter lights but on inspection the runners were perished so I recently ordered some new one from Moss and had stripped them down. So while British Grand Prix Practice and Qualifying ran on I sat in the lounge working the new rubbers into place using a blunt ended tea spoon. Apart from where it dug into my palm painfully it wasn’t too bad and I followed the general approach that Andy from Wiltshire Windscreens showed me when he fitted the front and rear screens. So with these done I loosely fitted the back in. I will tighten them when I get the glass as I think you need them loose to get the whole mechanism in and then you tighten it all up.

Also in preparation for the glass (which I need to order) I removed the lower bracket from the rear glass stay. I have ordered new ones of these with nice new felt lining but they don’t come with the bracket. Rather than put the old brackets on as they were. I decided they would be better painted. I used a Hammerite black straight to rust paint, brush applied. It doesn’t need to look good but it should be protected against corrosion hence this approach. I was a bit delayed in fitting the stays as the paint is still drying so I will need to fit those when I next get the MG out.

Waiting for these to dry before fitting

So that’s about it. Keith the TV aerial guy was passing with his mate and said Hi. A couple of other people nodded their appreciation (or sympathy or contempt it’s hard to tell) so it was an encouraging day on the MG. Last thing to say is that to save my back I towed it out the garage this morning with my CRV which worked reasonably well although I did need a willing assistant which was of course the ever patient Helen.

A closing thought about gratitude…

18 Feb 20 A day with Dad

A welcome visit from Dad who battled through, or rather around, floods in Gloucester to help me out today. Overall we made some useful progress, although as is often the case we had to go back to go forward. Before Dad had arrived, I pushed the MG out onto the drive and ended up unconnecting the loom under the bonnet because I now realise the routing of one of the branches was wrong and unless I pulled it all out, I wasn’t going to be able to connect the heater amongst other things. So a step back, but better to find it now than later.

Dad arrived and I prioritised having a cup of tea and an ice bun inside the house. You can’t mechanic on an emtpy stomach. So onto the work and Dad had expressed concern that we had not flushed the water jacket through. The heater control valve was clogged with rust on disassembly and so there was reason to suspect some corrosive sludge was lurking in the engine block. First we fitted the heater control valve to the engine block – this was to be our inlet for the flush – awkward job this as the bolts are inaccessible. I had tried new bolts, but these were about 2mm too long, so we had to dig out some shorter old bolts from the box of MG bolts. We then blocked up the top hose with a lump of wood wrapped in tape. With a finger in the temperature sensor hole and one on the heater rail pipe, we connected the garden hose and switched on. We got a dose of dirtyish water out the bottom hose, but not the expected deluge of rusty water. Holding my hand over the bottom hose built up a little bit of pressure, but we concluded that we had done what we could, so we refitted the radiator and hoses. This simple job actually took ages, because the radiator is awkward to remove and the hoses were not exactly co-operating either. In any case, we were in good spirits and Dad was great company.

Next Dad’s keen eye focussed in on the distributor which I had ‘fitted’ but he spotted that the clamp was on the wrong way and hence it wasn’t seated correctly, with the cap in contact with the steering column, which was a bit of a clue. Needless to say, he sorted that out although we weren’t able to accurately set the timing which needs to be done with a timing light apparently. Anyway, its in as good a state as it can be prior to attempting a start up in the near future.

What a top Dad he is

We broke for a sandwich lunch during which we were googling MGB engine bay pictures and researching bullet connector pliers. With a target of filling the car with coolant, our afternoon was spent in fitting and modifying in some cases the hoses of the cooling system. Facing a challenge with routing of the capilliary tube for the temperature sensor, Dad came up with a clever idea of using the bottom bolt of the heater control valve to fit a cable clip, lined with rubber hose to gently locate the tube and stop if waving around in the engine bay. Execution of this brilliant idea came down to me, and it was a pig of a job (thanks Dad) as the 7/16th bolt is very awkward to reach and one of those situations where you get about 1/4 of a turn at best with each placement of the open jawed spanner. Couldn’t get a socket or ring spanner to it, so just had to plug away. I only nearly cried once, but that was the wind in my eye. We then wound the excess length of the tube into coils to deal with any vibration in use.

Time was ticking on and Dad needed to get away for 3:00pm as flooding on roads near his house was a real risk, not to mention that he had worked bloody hard all day and is 73 years young. Of course, we made it with minutes to spare – all hoses complete and coolant topped up, and the car pushed into the garage missing a downpour of heavy rain.

So thanks to my Dad – he knows his stuff, he gets stuck in, he’s always looking to improve everything he tackles, he doesn’t let things get him down, he’s great fun to be around, are you getting the picture? He’s one in a million, thanks Dad.

24 Nov 19 A visit from the Master!

A good afternoon of tinkering the MG with my Dad (the Master!) Dad was a mechanic earlier in his career and although now retired, he has forgotten more about fixing cars than I will ever know. This makes time spent with Dad on the MG very valuable. Of course, it’s nice just being together for a bit of boys time, even if I have to put up with him frequently asking me why I didn’t bag and tag everything when I stripped the car. Next time, Dad, next time.

The jobs tackled today included:-

Radiator shroud fitted with lovely new shiny bolts (me). Door shuts adjusted (Dad). Old speedo cable removed (Dad and me) and the new one put in place but not connected up to the gearbox yet. A breakthrough moment here was Dad finding the bracket and bolt which holds the gear into the gearbox – what a genius.

Dad also gave me guidance on realigning the bonnet which got pulled out of alignment when fitting the gas struts. He has given me a methodology to follow so I will have a go at this one evening this week. We also worked out where the vacuum pipe for the servo goes onto the manifold which was useful.

Negative progress today in the removal of the front pulley which I cannot work out how to fit. Dad thinks it may be the wrong pulley so I will research on the internet if there are different types. As I am putting an electric fan onto the car, I don’t need the engine fan, so the assembly is not as per factory, but even considering this, the pulley doesn’t sit right . Second bit of negative progress was diagnosing that the four way brake union fitted some time ago is wrongly oriented by 45 degrees. As I’ve got it fitted, there is a pipe which fouls where the coil bracket is mounted. So I have to disconnect the pipes, carefully rebend them and connect it all up again. Better to have found this before I have filled the brake system with fluid that’s for sure.

So that was about it, a pleasant afternoon of diagnosing issues and nudging things along – thanks for your help Dad!